
“A new key pair should be used for each transaction to keep them from being linked to a common owner.” - Satoshi Nakamoto
In the Bitcoin whitepaper, Satoshi alluded to the privacy cost associated with address reuse.
Publishing a Bitcoin address as you would an email address - as a way to allow donations, for example - means handing the world a permanent public record of everything you’ve received to it, not to mention anything you later spend. This is especially problematic if the address is tied to your real-world identity. The alternative is to rotate addresses, generating a fresh one for each payer. It’s better for privacy, but it’s also fiddly: I built an open source library to automate it.
Today, Silent Payments offer a third option. You publish one address - it starts with sp1 - and can share it as widely as you like. Yet every person who pays you sends to a different address on-chain, meaning nobody watching can tell those payments share a recipient. There’s no interaction with the sender - unlike a Lightning invoice or LNURLp endpoint - and no XPUB to handle.
This has been possible on paper since BIP-352 was finalised, but real-world support is only now starting to appear. In 2026, Sparrow Wallet - the desktop wallet I recommend more than any other - shipped support for it. Paired with a new piece of server software called Frigate, it’s finally practical.
This is my hands-on guide. By the end you’ll have a working sp1 Silent Payments address of your own. Let’s get started.
1. How Silent Payments actually work
The first thing to understand is that an sp1 Silent Payments address isn’t a “normal” address. By this I mean it doesn’t correspond to an on-chain script or output the way a bc1q Segwit or bc1p Taproot address does. It does encode public keys - more on that in a moment - but those keys never appear directly on the blockchain. That’s why you can’t look up an sp1 address in a block explorer, which is basically the point.
Instead, an sp1 address is built from two main component parts:
- A scan key, used to find payments meant for you
- A spend key, used to spend those funds
Each of these has an associated public key and private key. The two public keys are encoded with a checksum and prefixed with sp1 to form a sharable Silent Payments address.
Here’s the flow when someone sends a payment to this address:
- The sender’s wallet takes the private keys of their transaction inputs, and combines them with the receiver’s scan public key (one of the two keys encoded in the
sp1address) to compute a shared secret. - That shared secret is then used to tweak the receiver’s spend public key, producing a brand-new Bitcoin address (specifically a
bc1pTaproot output) that only the sender and receiver are able to calculate. - When the coins arrive at this new Taproot address, there’s no flag or marker that this was a silent payment, but the recipient’s wallet is able to recognise it as a payment meant for them by using their scan key.
+ sp1 pubkeys
+ sp1 pubkeys
On the receiving end, the wallet’s job is to recognise those payments. Because the final destination of a silent payment depends partly on the transaction’s inputs (i.e. the UTXOs used to construct it), there’s no way to precompute all the possible receiving addresses. Instead, the wallet must scan the blockchain and look for Taproot outputs meant for the recipient. When it finds one, it can spend it using the spend private key - tweaked by that same shared secret.
The key point is this: two different senders paying the same sp1 address produce two unrelated-looking Taproot outputs, with no public link between them, and no link back to the original sp1 address. This unlinkability is what unlocks the privacy benefits for both parties.
2. Why scanning is hard, and why Frigate exists
Finding those payments is computationally expensive. An HD wallet has a fixed set of addresses, and a normal Electrum server simply watches those. With Silent Payments there’s nothing fixed to watch: each payment lands on a freshly-derived output that the recipient can’t predict. The only way to discover your coins is to take every eligible transaction, and replay the shared-secret calculation with the scan key to see what matches.
This added work is feasible on a full node (though support is very limited among the popular node stacks right now). On a mobile wallet - running intermittently with limited bandwidth and battery, not running a full node - it’s totally impractical.
Frigate is Sparrow’s answer. It’s an Electrum server - the same kind of server you’d connect a wallet to on your own node - extended with extra methods that do the Silent Payments scanning for you. It’s built for speed: the elliptic-curve work runs inside the database, with optional GPU acceleration. It also ingests the mempool in real time, so you see incoming payments before they’re even confirmed.
There’s now a public instance at frigate.2140.dev - maintained by 2140.dev - that anyone can use. This is what makes this practical for most people today, even those who aren’t running their own node. You can also run your own - more on why you might want to in a moment.
How sensitive is your scanning key?
To scan on your behalf, Frigate needs two things from your wallet: your scan private key and your spend public key. If you trust these to a public Frigate server, what can that server theoretically do?
In short, it can find every payment to your sp1 address and link them to you. It cannot spend any funds, but a malicious or compromised server could build exactly the picture of your receiving history that Silent Payments are meant to prevent. In this sense, the keys you hand over act much like an XPUB - they expose your history but can’t move funds.
Trusting a public Frigate server is close in spirit to trusting a public Electrum server, which sees the addresses your wallet asks about. Frigate - which is open-source software, like Sparrow - holds the keys you send in RAM only for your session, just as a normal server holds your addresses transiently. You’re trusting the operator not to misbehave. (BIP-352 does allow a more private model - the server sends “tweak” data and your wallet matches locally, never revealing the scan key - but it’s far heavier on the client, which is why Frigate scans server-side.) If that trust is more than you want to extend, you can just self-host Frigate. But that’s beyond the scope of this guide.
3. Set up a Silent Payments wallet in Sparrow
Let’s set up a new Silent Payments wallet. You’ll need a recent version of Sparrow (2.5.2 as of the last time I updated this page) installed on your desktop computer.
Create the wallet
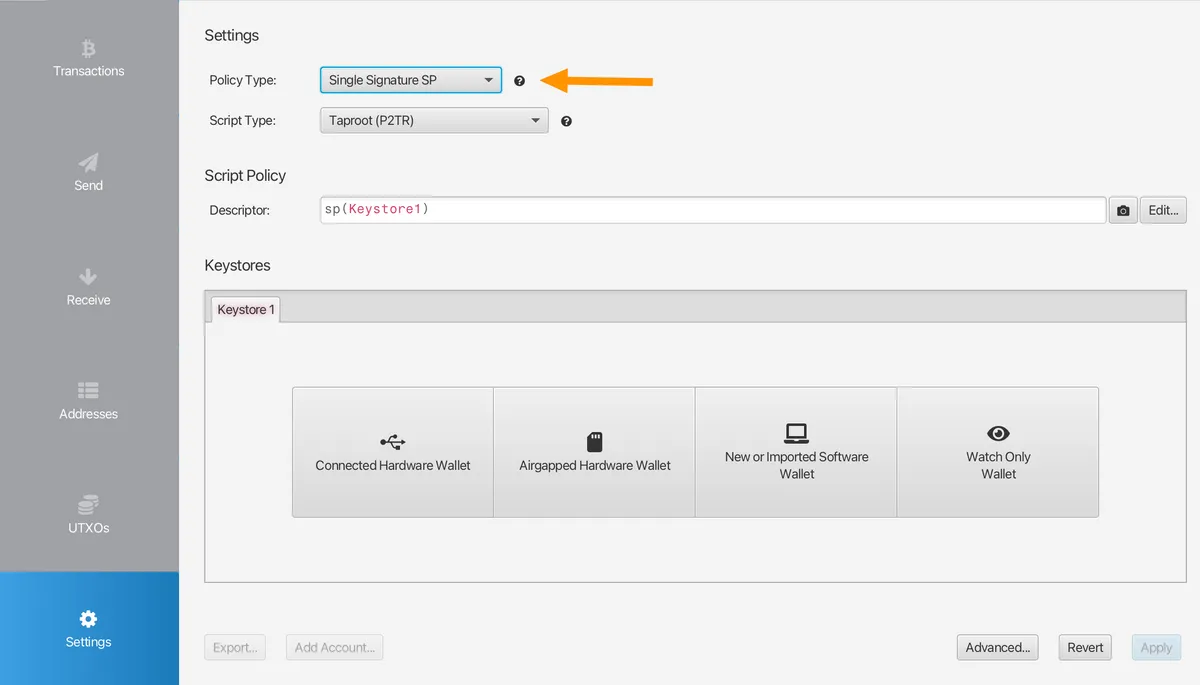
Open Sparrow and choose File → New Wallet, give it a name, and create it. Under Policy Type, select “Single Signature SP”. Taproot is the only Script Type available, as we discussed earlier.
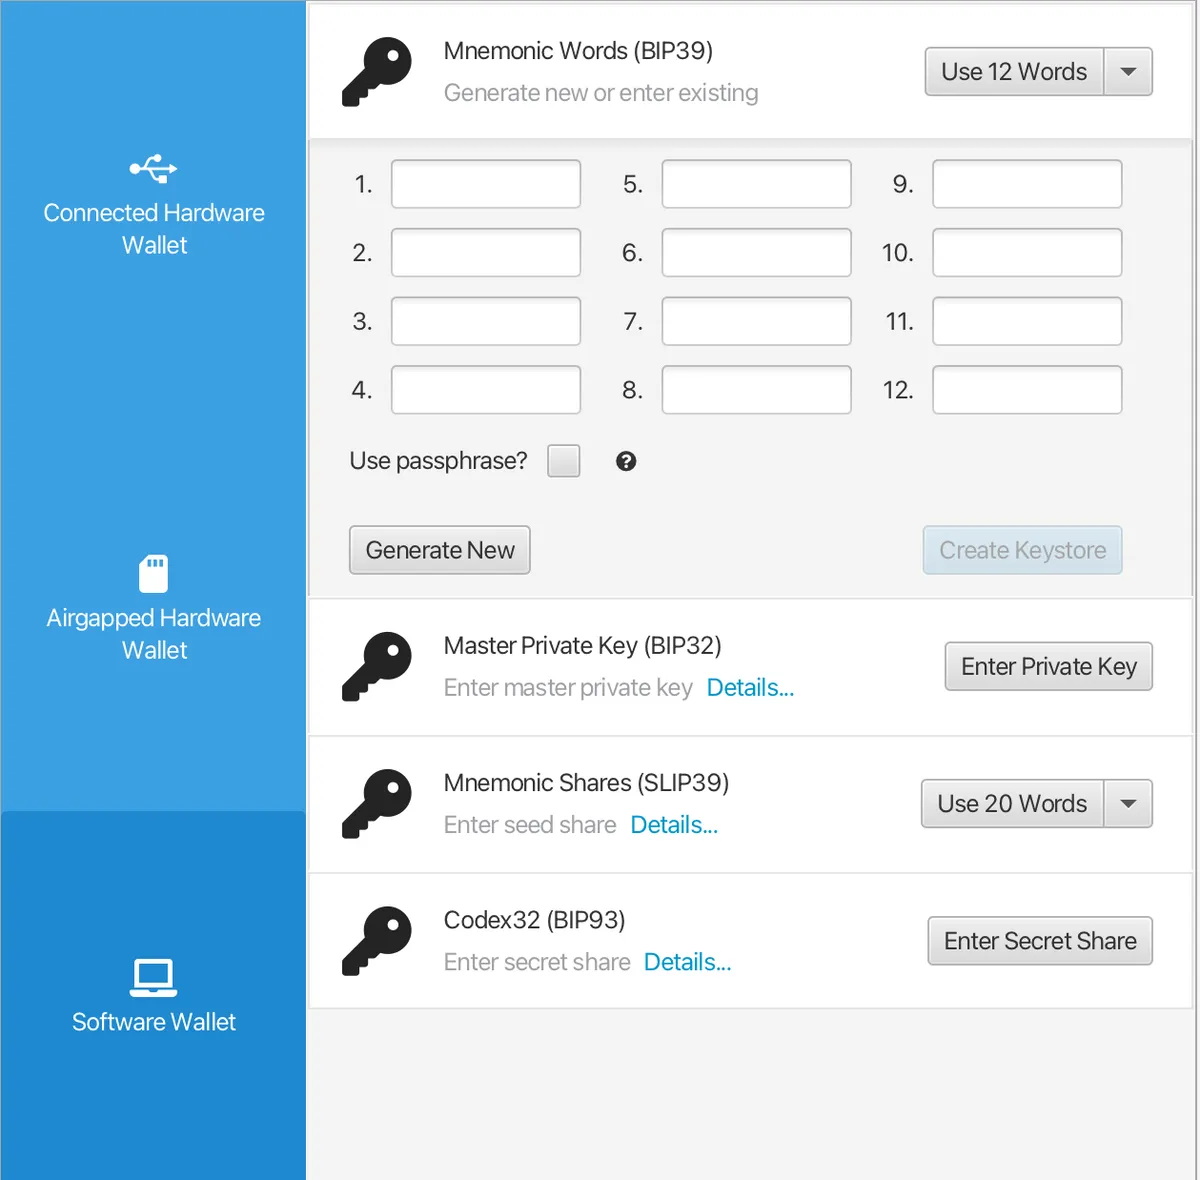
Under Keystores, hit “New or Imported Software Wallet”. Under “Mnemonic Words (BIP39)”, choose your preferred length - I’d suggest 12. Hit “Generate New”, and then copy down your seed words with a pen and paper and keep them safe.
Once you’re happy with your backup, hit Confirm Backup. You’ll be prompted to re-enter the words to verify the integrity of your backup. Once that’s done, hit “Import Keystore” to land back in the main screen, leaving the derivation path m/352'/0'/0' unchanged. Hit “Apply” in the bottom right - you’ll be asked if you want to add a password to the wallet in Sparrow.
Once that’s done, you’ll land back in the main Sparrow wallet screen:
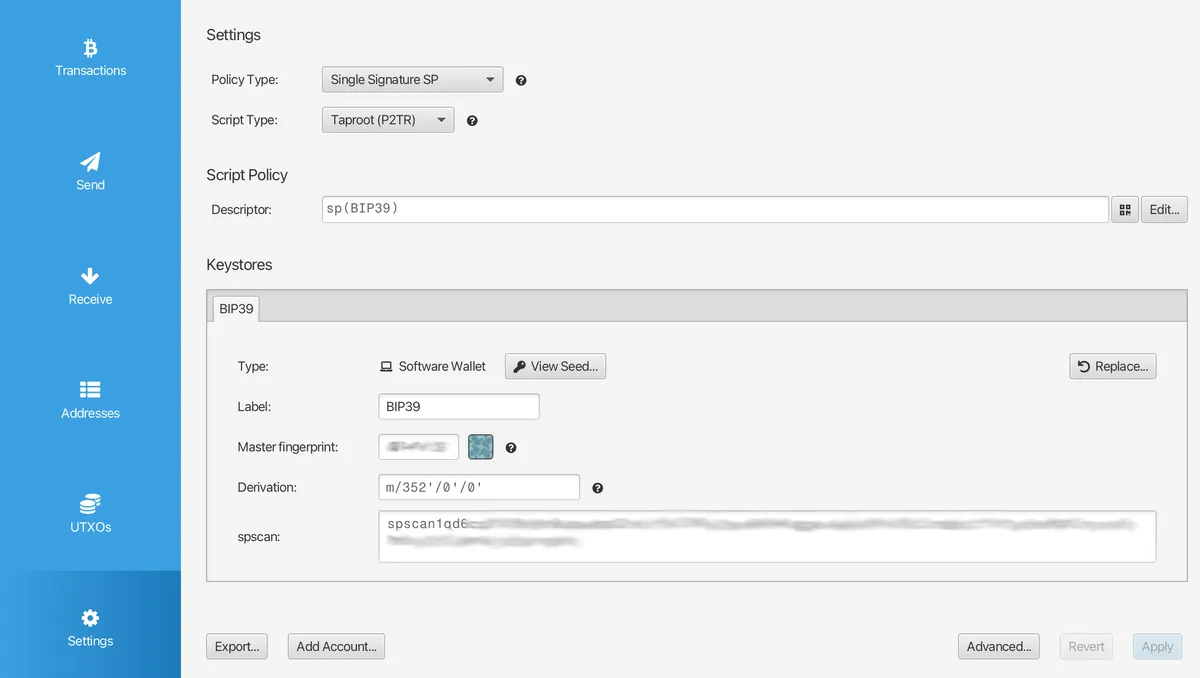
Note that we’ve just created a hot wallet, meaning all the keys live on your computer. We’ll talk about the current level of support for cold wallets (i.e. dedicated hardware devices) for both sending and receiving Silent Payments in section 5.
Connect to a Silent Payments server
A normal Bitcoin node can’t tell you when a silent payment has arrived, so Sparrow needs to talk to a server that can scan - in other words, a Frigate server.
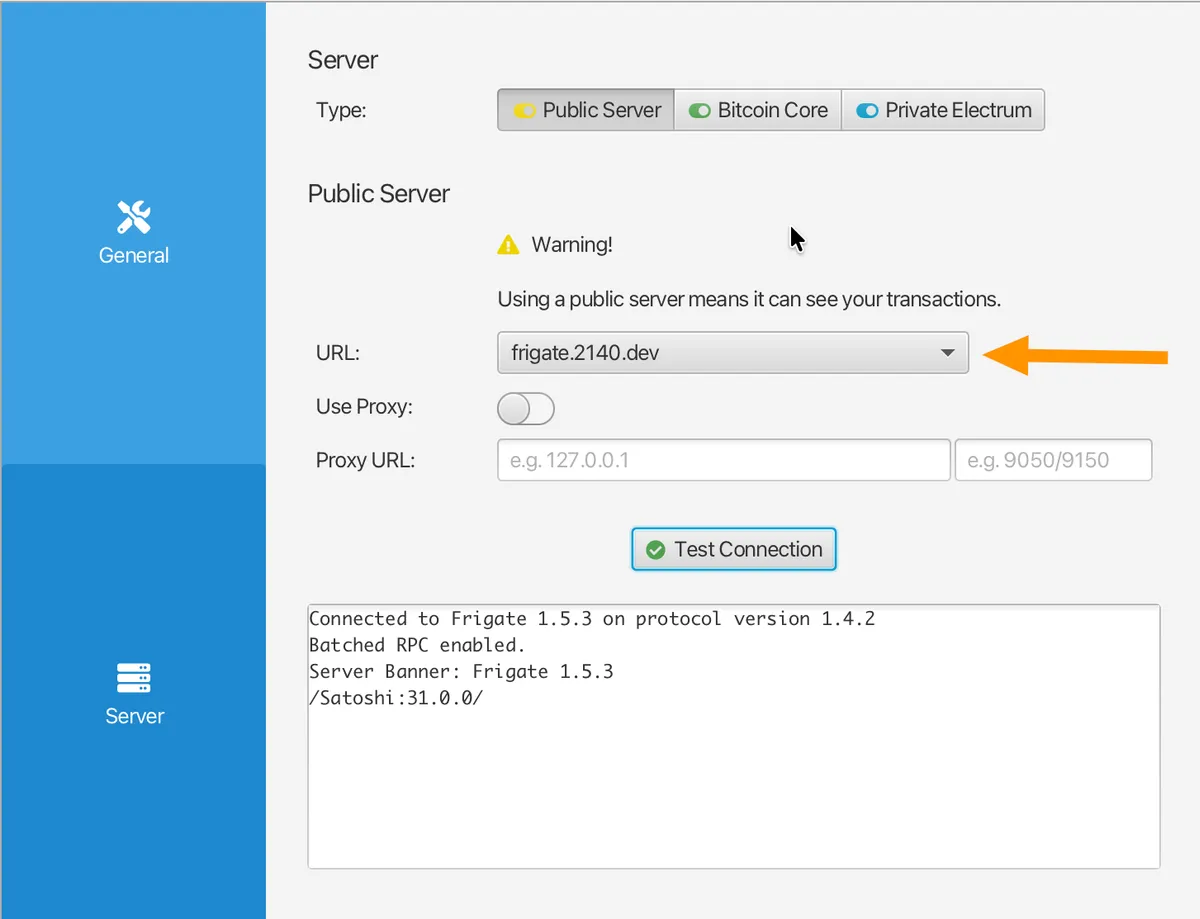
Open the main application Settings (Sparrow → Settings) and hit Server. If you’re running your own Frigate instance (against your own node), hit “Private Electrum” and enter its details. Alternatively, to use the public server, hit “Public Server” and choose frigate.2140.dev. Hit “Test Connection” and look for the success message.
Close the Settings screen and open the Transactions tab of your wallet. You’ll likely see “Wallet loading history for SP-Demo” (or whatever you called your wallet). Give it time - a little longer than you might typically wait for a normal Electrum server to scan - and eventually you’ll see “Finished loading.” And so your privacy journey begins!
Get your address
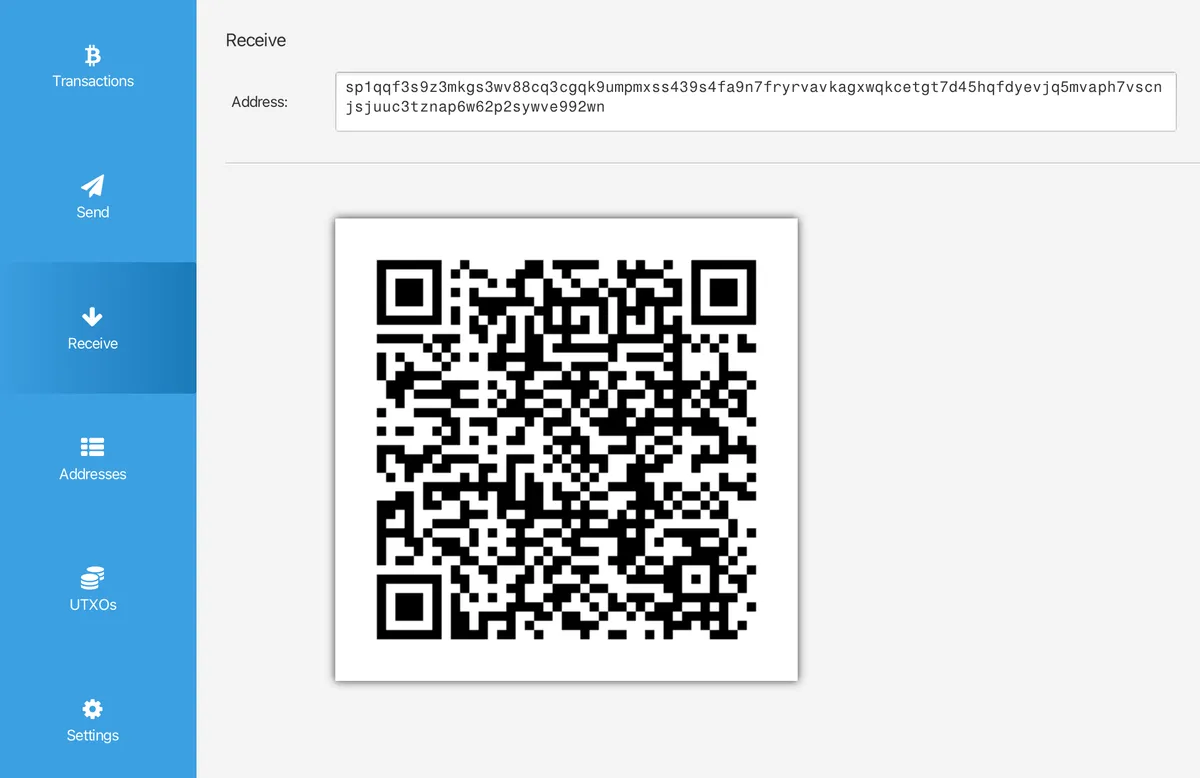
Open the Receive tab. Unlike a normal wallet, you won’t see a fresh address each time - you’ll see your one silent payment address, the sp1... string, and its QR counterpart. This is the one you publish, reuse, and share freely. You never need to change it.
Open the Transactions and UTXOs tabs, and you’ll notice they also look a little different from a “normal” Bitcoin wallet: they’re initially blank, because the addresses aren’t derived in advance. Once you receive a payment, these screens will begin to populate. Here’s what they’ll look like once you’ve received your first silent payment:
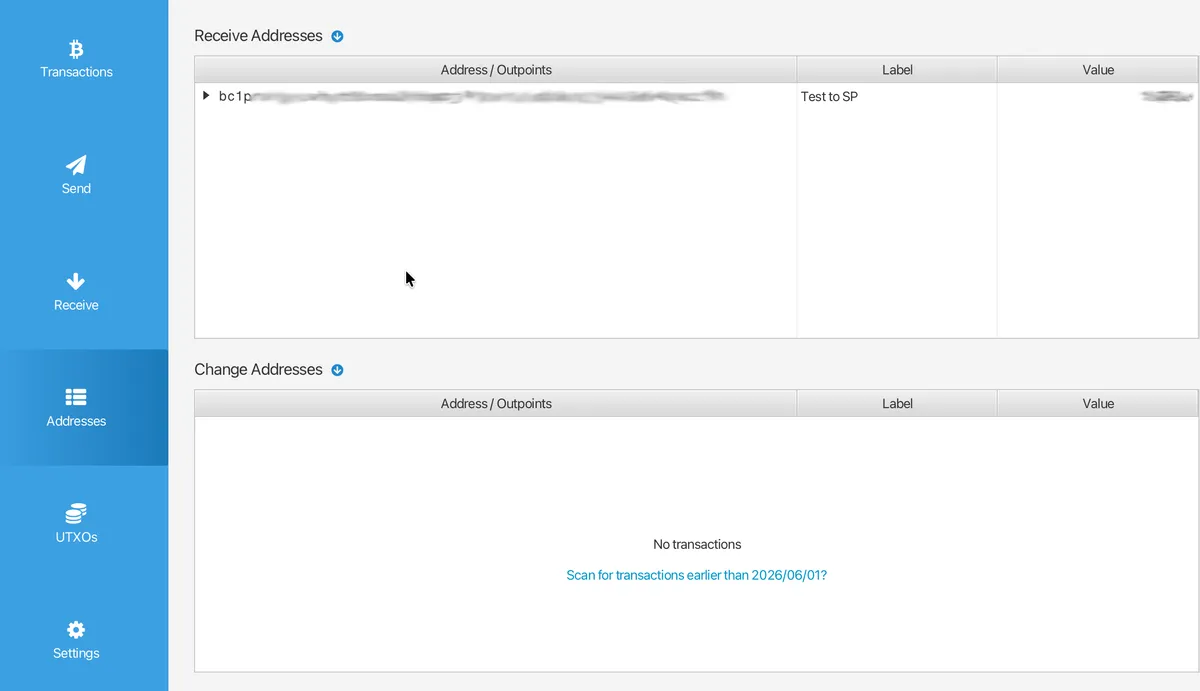
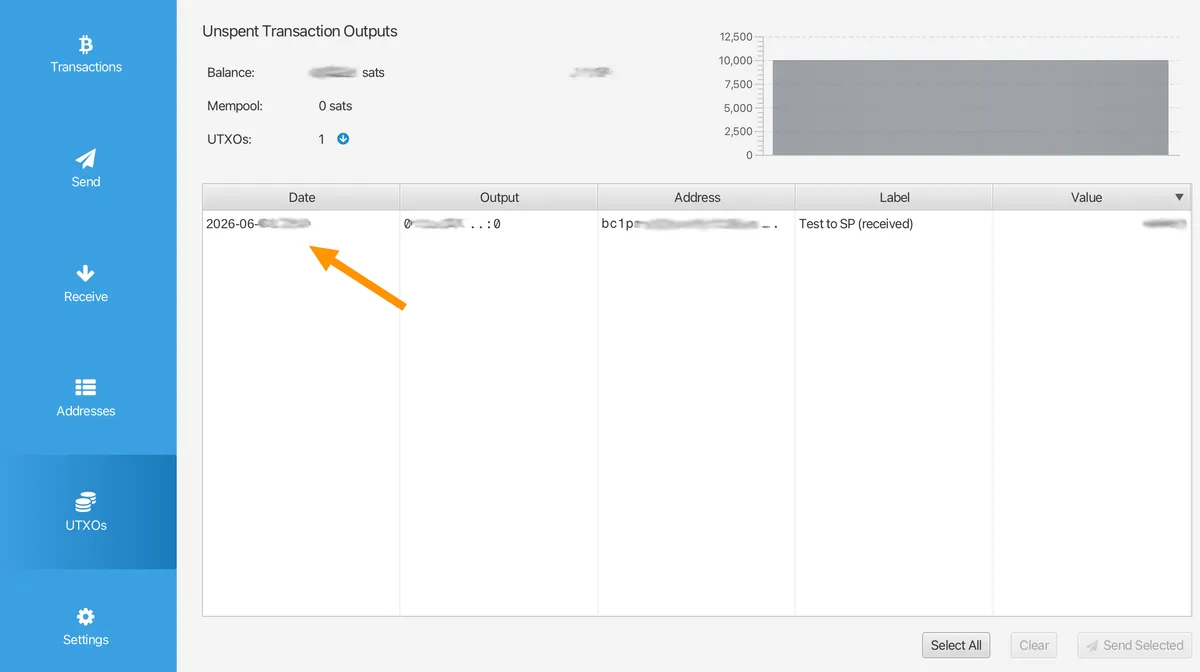
Every time you load this wallet in Sparrow, the server will scan for payments to addresses controlled by your wallet. Discovered payments show up in your Transactions and UTXOs tabs like any “normal” payment because, on-chain, that’s exactly what they are: ordinary Taproot outputs that only your wallet can recognise as yours.
So - we’ve covered the receiving side. But what about sending to a Silent Payments address?
4. Sending to a Silent Payment address
Support for sending to an sp1 address is further along than the receiving side. Beyond Sparrow, support’s been added by BlueWallet, Wasabi, Nunchuk, Cake and several other software wallets. A full compatibility table is available on silentpayments.xyz.
I’ll run through the process in Sparrow. On the Send tab, simply paste in the sp1 address as you would any other. Enter the amount you’d like to send and the fee, then hit Create transaction. In the transaction builder, you’ll see that the destination is still listed as an sp1 address:
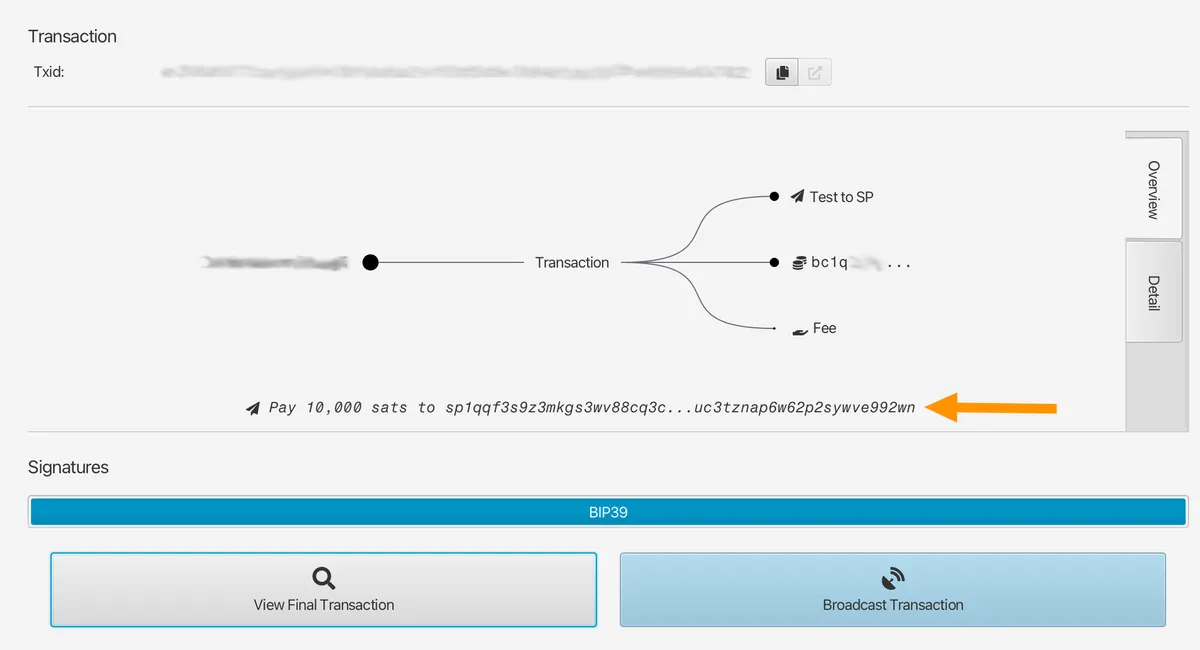
After being signed and broadcast, though, Sparrow will display the actual on-chain Taproot address (starting bc1p) to which the coins have been sent:
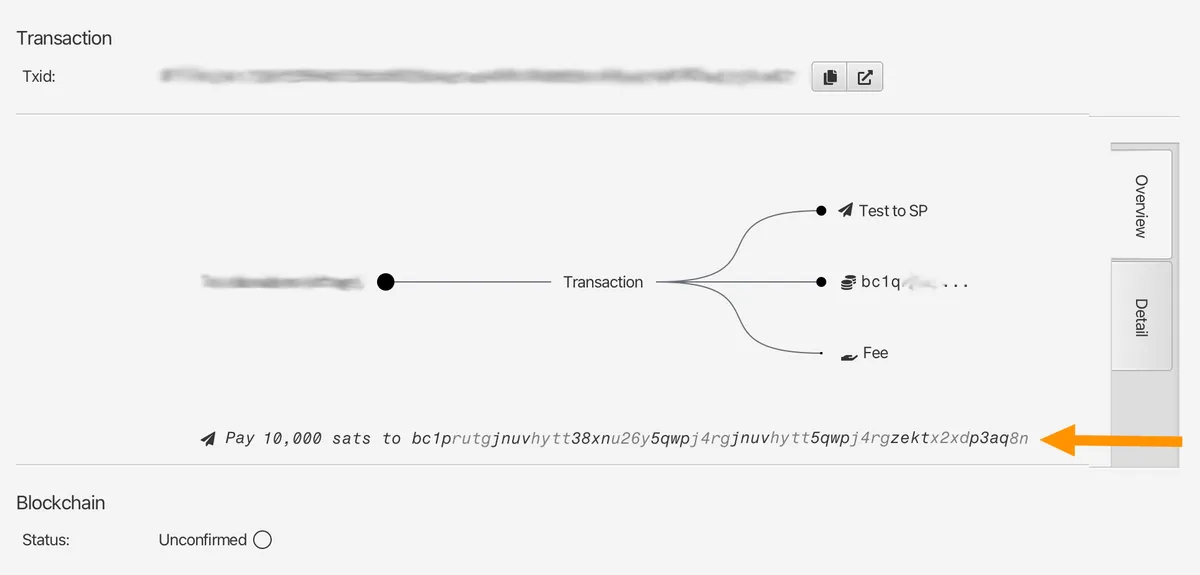
Behind the scenes, Sparrow has done the sender’s half of the maths from section 1 - deriving the one-time Taproot output from your transaction’s inputs and the recipient’s published keys - and broadcast the resulting transaction. Look it up on mempool.space, you’ll see a normal-looking Taproot payment. There’s no way to tell it was a silent payment, or to connect it to the sp1 address you sent to.
One subtlety worth flagging, because it matters for hardware wallets: the destination output depends on the inputs being spent. The wallet has to do an ECDH operation at signing time, using the input private keys. For a software wallet that’s invisible. For a cold wallet device, the entire purpose of which is to ensure the private keys never leave the device, it raises a whole separate compatibility question. This is the crux of the next section.
5. Hardware wallets and cold storage
Hardware support is one of the main things holding back widespread adoption of Silent Payments.
On the sending side, BitBox deserve huge kudos for being the first manufacturer to add full support for payments to sp1 addresses. I believe it might also be possible to sign Silent Payment transactions with an air-gapped Coldcard via PSBT (BIP 375), but I’ve not been able to verify this for myself yet. Will update this page when I know more.
Other than that, you’re out of luck - users with a Trezor, Ledger, or Blockstream Jade will not be able to send to Silent Payments addresses until the vendors add support.
What about receiving? If you run through my tutorial above, but try to import a keystore from a connected device, you’ll run into something like this:
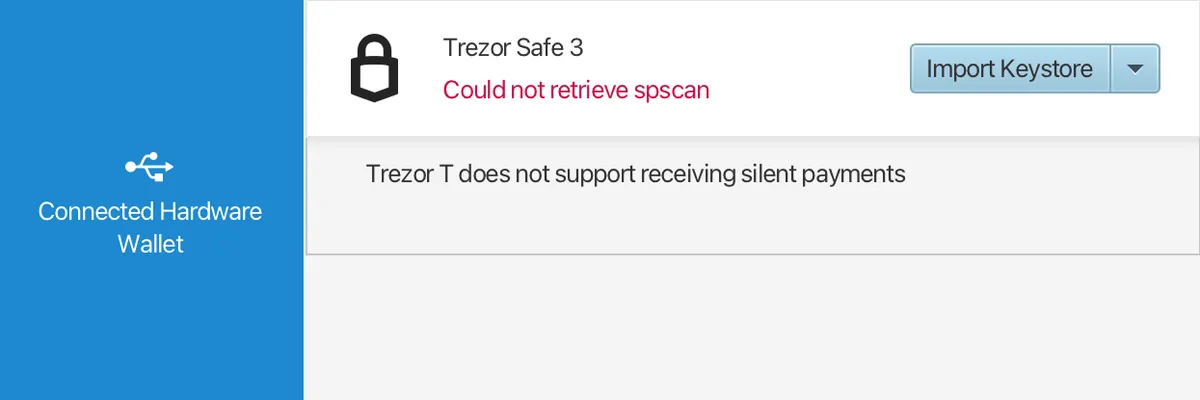
Putting aside the incorrect device label bug - this was a Safe 3, not a Trezor T - this error is accurate: you can’t currently receive silent payments to a cold storage wallet. If you read the explainer earlier, you’ll know that receiving to an sp1 address isn’t a simple derivation path change - to detect incoming payments, the wallet has to hold the scan private key and perform ECDH against the input public keys of essentially every transaction. A hardware wallet’s whole purpose is to never export private keys. While BIP352 specifically allows exporting the scan key (it can detect but not spend), doing so requires dedicated firmware support.
So, to summarise: for most people getting started, the pragmatic path is to run a hot wallet (see section 3) for receiving modest amounts privately, and sweep anything significant onward to your cold storage as you would normally. You’ll have to accept that most users with hardware signers won’t be able to send to your sp1 address just yet.
If Silent Payments aren’t ready for you yet
This is all new. One of the shortcomings I mention above might make this a non-starter for your purposes. That’s completely reasonable - and it’s exactly the gap I built my serverless donations library to fill. Rotating addresses remains a solid, self-custodial way to accept Bitcoin - from all kinds of wallets - without compromising your privacy.
6. Try it yourself
Once you’ve done the reading, the best way to keep learning about Silent Payments is to test it out. Remember that the spec is still new, so be very careful if you’re testing with real funds.
If you don’t have a compatible wallet to hand - or you’d rather experiment directly with the protocol - Silent Amulet is worth a look. It’s a complete BIP-352 wallet running as a single HTML file in-browser. You can even point it at your own Blindbit indexer, scanning locally rather than handing your scan key to a server - the more private model I mentioned back in section 2.
You can see if your existing wallet software can parse an sp1 address by scanning mine below:

If you’ve found this guide useful - and you have a compatible wallet - any sats sent here will be graciously received and keep these guides coming. Alternatively if your wallet doesn’t support Silent Payments, you can still sling me sats via good ol’ Segwit or Lightning.
I’d also encourage you to consider donating to Sparrow wallet. It’s one of the best projects in all of Bitcoin, is maintained by a single developer, and is completely free and open source.
Thanks for reading, and happy stacking.