Update, 2021: Algolia have released an official plugin for generating a search index! You’ll probably want to use that instead of my approach below. I’ll keep this guide live in case it’s helpful to anyone.
Today I’m going to explore how you can implement full-text site search functionality on a static website powered by Hugo.
- Introduction
- How Algolia works
- Build a search index template
- Create an Algolia index
- Send your search index to Algolia
- Building a search front-end
- Wrapping up
1. Introduction
For bloggers transitioning from WordPress to a static site generator, implementing site search is often one of the first major challenges. The ability for users to enter a query and instantly see relevant results is something we take for granted when working with a dedicated server and database. Once your website is just a collection of static HTML files on a CDN, however, the technical challenges are brought into stark relief:
- How is all your content to be indexed?
- How is that index to be kept up-to-date?
- When a user enters a search term, how is that index to be queried?
- What algorithm should be used to rank results?
- How will those results be returned to the user?
To solve this challenge on Tom’s Carnivores I opted to use Algolia, a SaaS company specialising in hosted search. Other solutions are available, many of which require less effort (e.g. Google Custom Search) or eliminate dependence on a third party service (e.g. a solution based on LunrJS or this approach by Phil Hawksworth). However, these typically require compromises I was not willing to make: taking the user off-site, significantly impacting the page load speed, an inflexible ranking algorithm, or not being able to serve autocomplete results.
I struggled to find a tutorial that covered end-to-end implementation of Algolia on websites built with Hugo, so that’s what I’ll be providing here.
2. How Algolia works
Algolia is a hosted search engine capable of delivering real-time results from the first keystroke. In other words, you generate a search index JSON file as part of your build process, and send that to the Algolia REST API. When a user enters a search term, Algolia’s JavaScript API Client queries that index directly from the browser and receives relevant results. You then display these results in whichever pretty format you so desire.

It has a generous free tier for non-commercial projects, paid plans starting at $29/month, as well as a special license for open-source or non-profit organisations. It’s also eminently scalable with powerful features including typo tolerance, custom ranking engines and query rules, personalisation, query-based CTAs, and A/B testing.
Whichever tier you opt for, the first step is to assemble a search index file.
3. Build a search index template
Before starting, I would strongly recommend reading Algolia’s article on preparing data for indexation. The TL;DR is that you need to decide what information and attributes you want to make searchable - think titles, categories, tags, and so on - then assemble that data into a machine-readable JSON file. The Algolia format is schemaless: your objects can be structured however you like as long as each record contains a unique Object ID.
Hugo’s custom output formats feature means that we can configure our site generator to assemble our markdown content into the required format, similar to how Hugo automatically creates an XML sitemap. Note that we’ll also be relying on several fairly-new Hugo functions, so ensure you’re using an up-to-date version of Hugo (0.62.2 at time of writing).
Open your config.toml file. We’re going to define a new plain-text, JSON output format by adding the following:
[outputs]
home = ["HTML","RSS","Algolia"]

[outputFormats.Algolia]
  mediaType = "application/json"
  baseName = "algolia"
  isPlainText = true
  notAlternative = true
In your layouts directory, create index.algolia.json. This is where we’ll build our search index template. Depending on which attributes you want to be searchable, you could use something as simple as this:
{{- $index := slice -}}
{{- range $page := $.Site.RegularPages -}}
    {{- $index = $index | append (dict "objectID" $page.File.UniqueID "title" $page.Title "date" $page.Date "href" $page.Permalink "summary" $page.Summary "tags" $page.Params.tags ) -}}
{{- end -}}
{{- $index | jsonify -}}
This will iterate over your site’s regular pages (your actual content, rather than taxonomies or list pages) and assemble a JSON file with the title, date, URL, summary, and tags of each. To create the aforementioned Object ID for each record we’re using Hugo’s .File.UniqueID variable, which returns the MD5-checksum of the content file’s path.
If you want full-text search functionality - the ability for users to query the entire textual content of each page - things can get a little more complicated on account of Algolia’s 10kb limit for each record. The documentation recommends splitting larger entities (such as long articles) into multiple smaller records and then configuring Algolia to treat them as one entity using the distinct flag.
There are lots of ways to achieve this. The Algolia documentation recommend splitting by paragraph but don’t give have any Hugo-specific guidance on doing so. Roman Komarov uses a cool Gulp script to split his articles by subheading, while many of the other guides on this topic pre-date the release of features added to Hugo over the last 18 months, some of which are extremely useful for this task and avoid heavy reliance on .Scratch (e.g. variable overwrites in Hugo 0.48).
Below is what I’m using for my search index template. One record is created for each chunk. The .UniqueID is appended with an incrementing integer to keep the Object IDs unique.
Updated 10th July 2020: Many thanks to Yi Zhou for his suggestion of using the seq function to split post content into 1000 word chunks without lots of boilerplate code!
{{-/* $index is an array of json objects that we'll submit to Algolia */-}}
{{- $index := slice -}}
{{- range site.RegularPages -}}
  {{- $page := . -}}
  {{-/* Split long posts into 1000-word chunks for less noise in results */-}}
  {{- $chunked := slice -}}
  {{- $post_len := len .PlainWords -}}
  {{- range $i := (seq 0 1000 $post_len) -}}
    {{- $chunked = $chunked | append (delimit (first 1000 (after $i $page.PlainWords) ) " " ) -}}
  {{- end -}}
  {{-/* Add each chunk to $index with different object IDs */-}}
  {{- range $i, $c := $chunked -}}
    {{- $index = $index | append (dict "objectID" (print $page.File.UniqueID "_" $i) "content" $c "order" $i "title" $page.Title "date" $page.Date "href" $page.Permalink "tags" $page.Params.tags ) -}}
  {{- end -}}
{{- end -}}
{{- $index | jsonify -}}
Run hugo or your usual build command, and you’ll find something like this in your /public directory:
[
  {
    "content": "First 1000 words here...",
    "date": "2019-12-28 00:00:00",
    "href": "https://yourdomain.com/2019/12/28/lengthy-blog-post",
    "objectID": "163846258b8839cf2591a6b88c522d84_0",
    "order": 0,
    "tags": ["conferences"],
    "title": "A lengthy blog post"
  },
  {
    "content": "...and the second 1000 words here.",
    "date": "2019-12-28 00:00:00",
    "href": "https://yourdomain.com/2019/12/28/lengthy-blog-post",
    "objectID": "163846258b8839cf2591a6b88c522d84_1",
    "order": 1,
    "tags": ["conferences"],
    "title": "A lengthy blog post"
  },
  {
    "content": "Full text of a much shorter blog post",
    "date": "2019-12-30 00:00:00",
    "href": "https://yourdomain.com/2019/12/30/short-post",
    "objectID": "870ac2c2fb1d467a825b0c1694734233_0",
    "order": 0,
    "tags": ["quick-reads"],
    "title": "A quick, short blog post!"
  }
]
Pat yourself on the back! You’ve generated a machine-readable summary of your site’s content which can be indexed by Algolia. Which brings us onto the second stage…
4. Create an Algolia index
This step is easy. Algolia has no expectations of what your data will contain, so you don’t need to pre-configure it to reflect the structure of your search index. Any adjustments to the ranking logic (and that includes configuring the engine to understand our 1000-word record splitting) can wait until later, once the connection is up-and-running.
All we need to do now is create an index and grab our API keys. Open an account with Algolia. On the main dashboard, hit New Application. Give it a memorable name, select the ‘Community’ plan, hit Create, then select a primary Region where you’d like your data to be hosted.

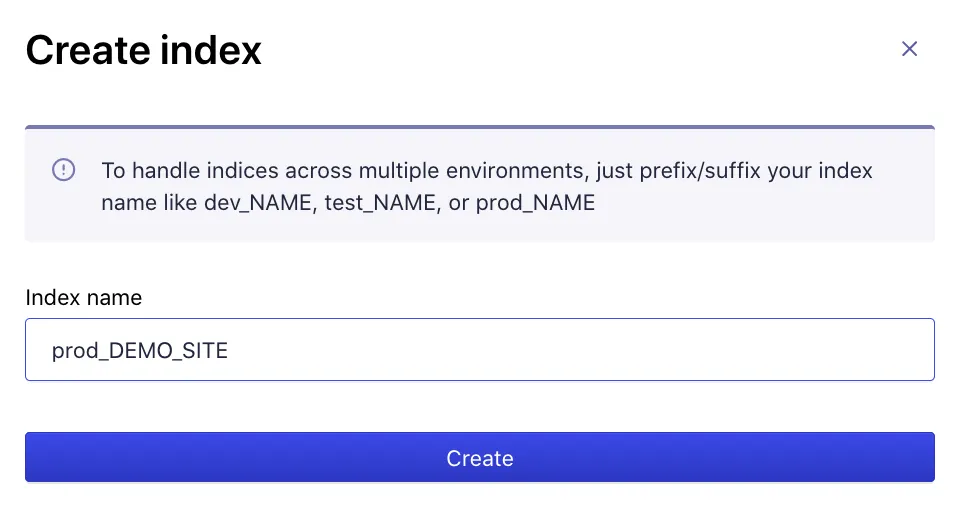
Next, head to Indices and create a new index for your site. Ours will be called prod_DEMO_SITE.
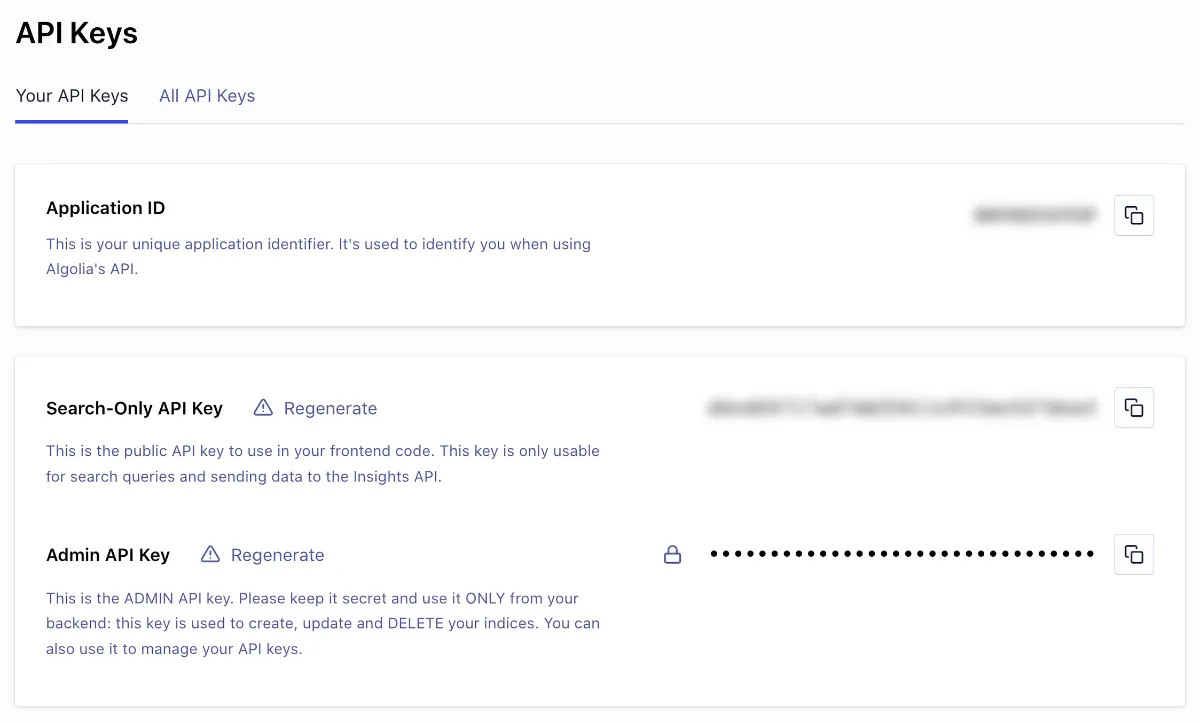
Hit API Keys and make a note of your Application ID, Search-Only API Key, and Admin API Key. Keep this secret - unlike the search-only key which we’ll use in our front-end to query the index, the admin key is used to update and delete records.
Recap: We’ve configured Hugo to generate a search index file and prepared an empty remote index on Algolia. How do we keep these two in sync?
5. Send your search index to Algolia
Every time you make changes to your site and run hugo, your search index file will be rebuilt. We need to send any new or updated records to Algolia as efficiently as possible. Remembering that the free tier includes 50K operations and 10K records, we want to minimise the number of changes we make to our remote index.
Thankfully there’s an excellent Node package which makes this very easy: atomic-algolia. It compares your local index with the remote Algolia index, then sends new or updated records while also removing any deleted records.
Install the package in your project’s directory using npm:
npm install atomic-algolia --save-devBefore using the package you’ll need to give it the details of your index, including our Admin API Key. To avoid hardcoding these values in our package.json, we can use environment variables. To send the index from your local development machine, head to your project directory and run touch .env && open .env and add the following. Update the braced portions with your details from Algolia:
ALGOLIA_APP_ID={{ YOUR_APP_ID }}
ALGOLIA_ADMIN_KEY={{ YOUR_ADMIN_KEY }}
ALGOLIA_INDEX_NAME={{ YOUR_INDEX_NAME }}
ALGOLIA_INDEX_FILE=public/algolia.json
With your variables in place, you can add the following to your npm scripts:
"scripts": {
    "algolia": "atomic-algolia"
}
Once you’ve run hugo or your usual build command to generate a search index in /public, you can update your remote index for the first time by running:
npm run algoliaYou’ll see something like this:

Time to head back to Algolia to check everything worked as expected…
Configure Algolia and automate future updates
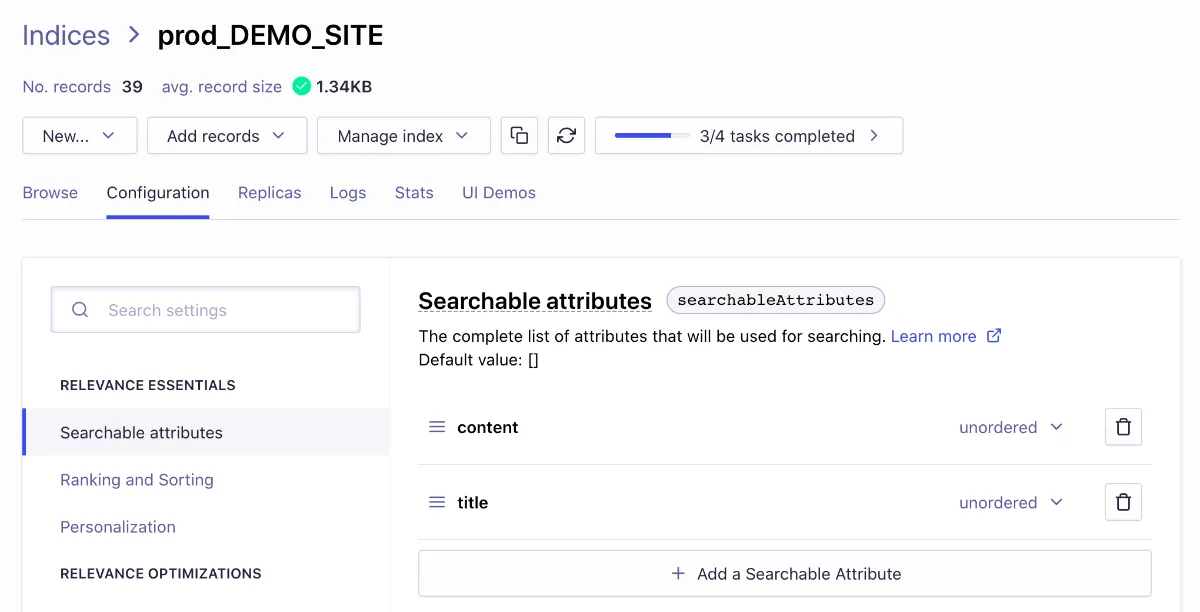
Navigate to your Algolia dashboard to check that your records have appeared in your index. If all looks good, you’ll want to select which of your attributes you’d like to be searchable - head to your index, hit Configuration and then Searchable attributes under ‘Relevance Essentials’.
Test out the default ranking algorithm by entering a query under the Browse tab and seeing what is returned!
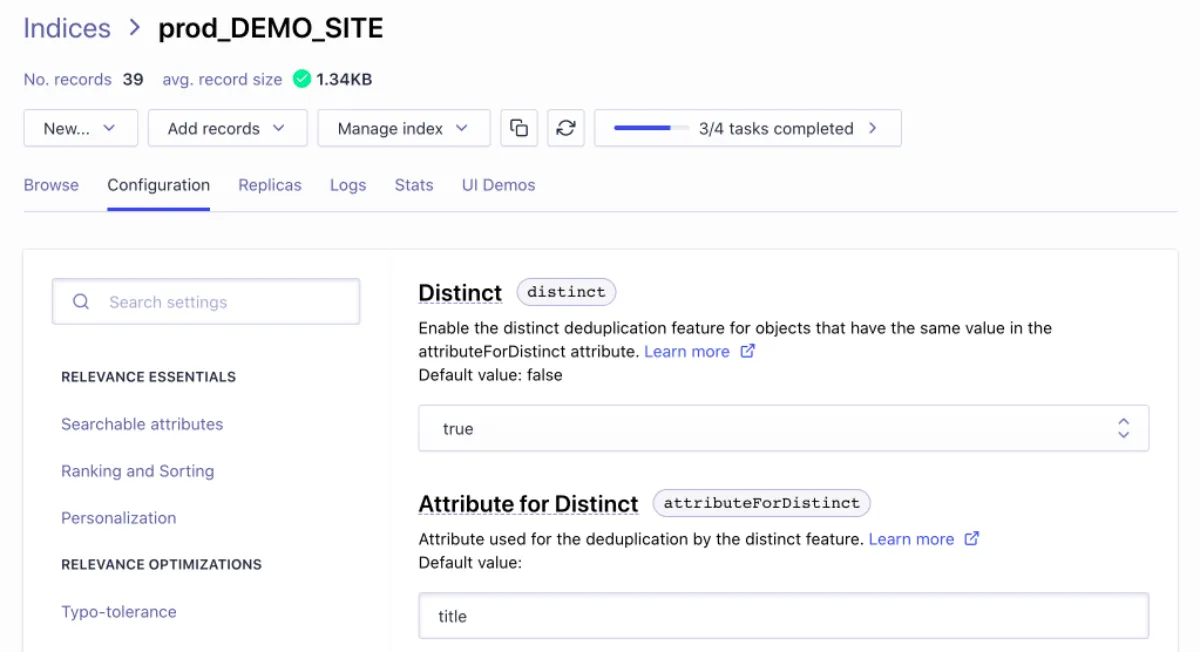
Now is also good time to configure your record splitting (if you’re pushing full article text in chunks as described above). Under Configuration and then Deduplication and Grouping under ‘Search Behavior’. You want to set Distinct to true, then enter an Attribute for Distinct. This is the attribute which will be used to deduplicate your objects, so it should be a variable that is consistent between each chunk of an individual post. I suggest using title.
Finally, you’ll want to make sure your remote index is always kept in sync with your content. For this reason, I recommend adding atomic-algolia to your production build command (in this case, npm run build:prod). For example:
"scripts": {
"algolia": "atomic-algolia",
"start:dev": "hugo server -F -D",
"build:prod": "hugo && npm run algolia"
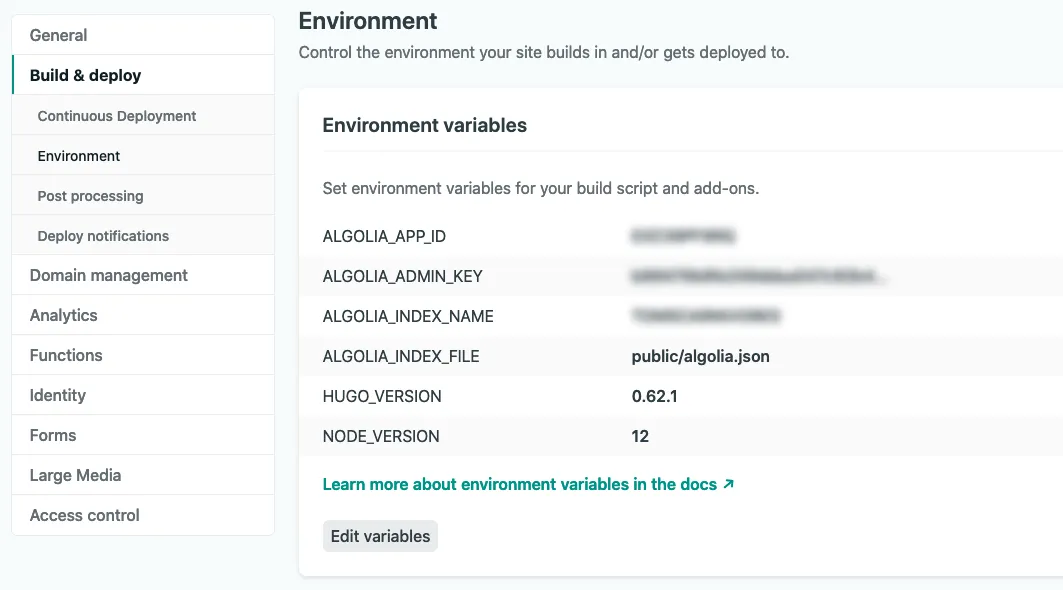
}If your site is hosted on Netlify, it’s easy to make these Algolia updates a part of your production build process. All you need to do is add your environment variables - the App, index, and API details we previously added to a local .env file - to your Build & deploy settings on the Netlify dashboard, and ensure that atomic-algolia is run as part of your production build command.
I prefer this approach to running Algolia updates locally - it means the entire build for my site - including asset processing, running Hugo, running Workbox, and updating Algolia - can be handled remotely on Netlify. Since I only want to update my Algolia index when I’m deploying to production, I have no need to run this script on my local development machine (aside from initial setup and testing).
Recap: Our production build command now generates a search index file and pushes this to Algolia, keeping the remote index perfectly in sync with our latest content.
6. Building a search front-end
The final step is a big one: we need to add a search field to our front-end, send users’ queries to Algolia, and then process the results it returns into a UI.
There are dozens of ways you could approach this challenge and Algolia has great documentation on the possible solutions (since this part of the process is not specific to Hugo). Their flagship library - InstantSearch.js - allows developers to build extremely powerful and extensible search interfaces covering pretty much every scenario you can think of.
For me, this would’ve been overkill. I was dealing with a small website and had fairly simple requirements: about 70 regular pages, albeit with full-text indexation. I didn’t even want a separate ‘results page’: my goal was to begin showing results to the user from the moment they started typing, preferably in a pop-out widget that dynamically updated with every keystroke, highlighting the relevant extract in each result.
The best solution I’ve found is autocomplete.js, another Algolia library. At 57kb it’s a lightweight script with a simple yet powerful API which gives you considerable freedom to customise the look and feel. It has just one dependency, namely the Algolia Search JavaScript API library, the search-only ‘Lite’ version of which is 41kb.
Check it out on GitHub and be sure to experiment with the demo implementation on Code Sandbox to get an idea of its capabilities and requirements.
A bare-bones setup would look something like this:
<!-- Search input -->
<input
  type="search"
  id="search-input"
  placeholder="Search..."
  autocomplete="off"
/>
<!-- Load Algolia scripts -->
<script src="https://cdn.jsdelivr.net/npm/algoliasearch@3/dist/algoliasearchLite.min.js"></script>
<script src="https://cdn.jsdelivr.net/autocomplete.js/0/autocomplete.min.js"></script>
<!-- Initialise search -->
<script>
  var client = algoliasearch("YourApplicationID", "YourSearchOnlyAPIKey");
  var index = client.initIndex("YourIndex");
  autocomplete("#search-input", { hint: false }, [
    {
      source: autocomplete.sources.hits(index, { hitsPerPage: 5 }),
      displayKey: "title",
      templates: {
        suggestion: function (suggestion) {
          return suggestion._highlightResult.title.value;
        },
      },
    },
  ]).on(
    "autocomplete:selected",
    function (event, suggestion, dataset, context) {
      console.log(event, suggestion, dataset, context);
    }
  );
</script>
Once you’ve inserted your Application ID, Search-Only API Key, and Index Name under ‘Initialise search’, this code is basically ready-to-go. Obviously it’ll be completely unstyled, but it should give you some idea of the library’s core functionality. A set of very basic styles (and details of the default CSS classes so you can write your own) are available in the autocomplete.js GitHub repository.
Note that the default behaviour upon clicking on a result is to log the suggestion to the console. If your requirements are anything like mine, you’ll want to eventually navigate the user to the destination of the result in question (e.g. by setting window.location.href to suggestion.href).
In the example above I’ve opted to use title as the display key, meaning this is what will be displayed for each record. If you’re indexing the full textual content of each post (or even just post summaries), I’d recommend making use of the autocomplete.js library’s integration with Algolia’s highlighting and snippeting features. This will enable you to show your users a relevant extract from each result surfaced by Algolia.
Recap: Every time you update your site, changes to your search index file are automatically sent to Algolia. Within seconds, users who enter a query into your site search box will see up-to-date results within a few keystrokes. 🥳
7. Wrapping up
I hope this guide has been useful! What I like about this solution is how low maintenance it is - once you’ve configured Hugo and Algolia and updated your build process, all updates to the index are handled seamlessly. If it weren’t for the helpful prompts that atomic-algolia prints in your build logs (X hits added, updated, removed, etc) you could easily forget it was even happening. The burden on the user is also low, both in terms of UX complexity and the performance impact.
There are also loads of ways you could extend this approach and tailor it to your unique requirements. Algolia enables complex sorting logic and result grouping, custom tie breaking rules, and configuration of common abbreviations or slang using the Synonyms feature. The possibilities are endless.
If you have any comments or questions, send me an email. Thanks for reading; until next time!