
If you’ve ever wanted to accept Bitcoin donations on your site without trusting a payment processor or exposing your wallet, this page is for you. I’ve built a simple open-source library for accepting Bitcoin payments - on-chain or via Lightning address - from strangers. It’s permissionless, private, and fully self-custodial.
You don’t need to run your own node or manage any backend infrastructure. No third-party gateways and no hidden fees. All you’ll need is a basic understanding of how Bitcoin addresses are derived (I’ll cover the essentials) and the ability to deploy a serverless function - e.g. via Cloudflare Workers or Netlify.
Below is a fully-functional preview of what we’re going to build. Any Bitcoin sent to this particular address comes to me, and pays for coffee to fuel my future tutorials!
Let’s go!
Contents
- Who’s this for?
- Prerequisites: what you’ll need
- Step-by-step setup
- Maintenance & enhancements
- Closing thoughts
1. Who’s this for?
The approach I’m going to show you today is a minimalist, free, DIY solution for technically-curious people who are new to payments or donations in Bitcoin. I’d say it might be useful if the following apply to you:
- You want to accept Bitcoin from strangers, with no middlemen or fees, in a fully-automated yet non-custodial way, while maintaining as much privacy as is practical (i.e. avoiding address reuse)
- Your incoming payments or donations are fairly infrequent and not business-critical, and you don’t yet need invoicing, point-of-sale, or CMS integrations
- You like getting your hands dirty with a learn-by-doing approach
What if this doesn’t apply to you? If your requirements are more advanced than this, then you might be better off using an established payment gateway.
Why not BTCPay Server?
BTCPay Server is an incredible piece of software. It’s a free, open-source, non-custodial payment gateway that allows individuals and businesses to accept Bitcoin with no third parties and without fees. It’s a powerful full-stack solution - ideal if you need point-of-sale or CMS integrations. But if you’re just looking to accept Bitcoin occasionally with strong privacy, it might be overkill.
My approach aims to be far leaner and scrappier, with no costs and low technical overheads. You can always upgrade to BTCPay Server in the future!
Why not just publish a static address?
This is a good question that everyone runs into at some point in their journey, so I’ll answer it here.
There’s no technical reason why you can’t reuse a Bitcoin address. But doing so can severely undermine your privacy and that of others. Satoshi Nakamoto even alludes to this in the original Bitcoin whitepaper, recommending that “a new key pair should be used for each transaction to keep them from being linked to a common owner.”
Reusing a Bitcoin address allows anyone to view the full transaction history associated with it. Your incoming payment amounts, frequency of payments, and even your future outgoing spends from that address are irreversibly public. It’s then trivial for blockchain analysis companies - or even motivated individuals - to link transactions to your real-world identity, potentially exposing your wider financial activity.
This is one of the reasons why silent payments (as described by BIP 352) are proving to be a popular proposal. Until they’re widely available, rotating addresses is a good solution.
2. Prerequisites: what you’ll need
First things first - how does it work?
In a nutshell, this approach uses your extended public key (XPUB) to generate new public addresses on-the-fly. A simple serverless function stores a small pool of addresses in a key-value data store, checking whether they’ve been used and refreshing them as required. Meanwhile a client-side script persists one address per user and renders a QR Code.
For this tutorial, I will assume that you already have a self-custodial Bitcoin wallet. If you don’t have one, get one!
Beyond that, you will need:
- Your extended public key (XPUB, or more likely ZPUB or TPUB on a modern device)
- The ability to create a serverless function and KV data store, available in the free tier of many popular hosting providers: Netlify, Vercel, Cloudflare.
- (Optional) Your own Bitcoin node, enabling you to check your balances in a trustless way (i.e. without exposing your IP address)
If any of the concepts or tools above are new to you, I recommend following the links I’ve provided and familiarizing yourself.
3. Step by step setup
3.1 Get your XPUB
I strongly recommend using a dedicated account within your existing wallet, because it will make it easier to check your balance later.
Account creation is easy with most popular wallet software (see steps for Trezor, Ledger). Create your account, and note down your XPUB (e.g. xpub6DUv...) and its derivation path (e.g. m/84'/0'/1').
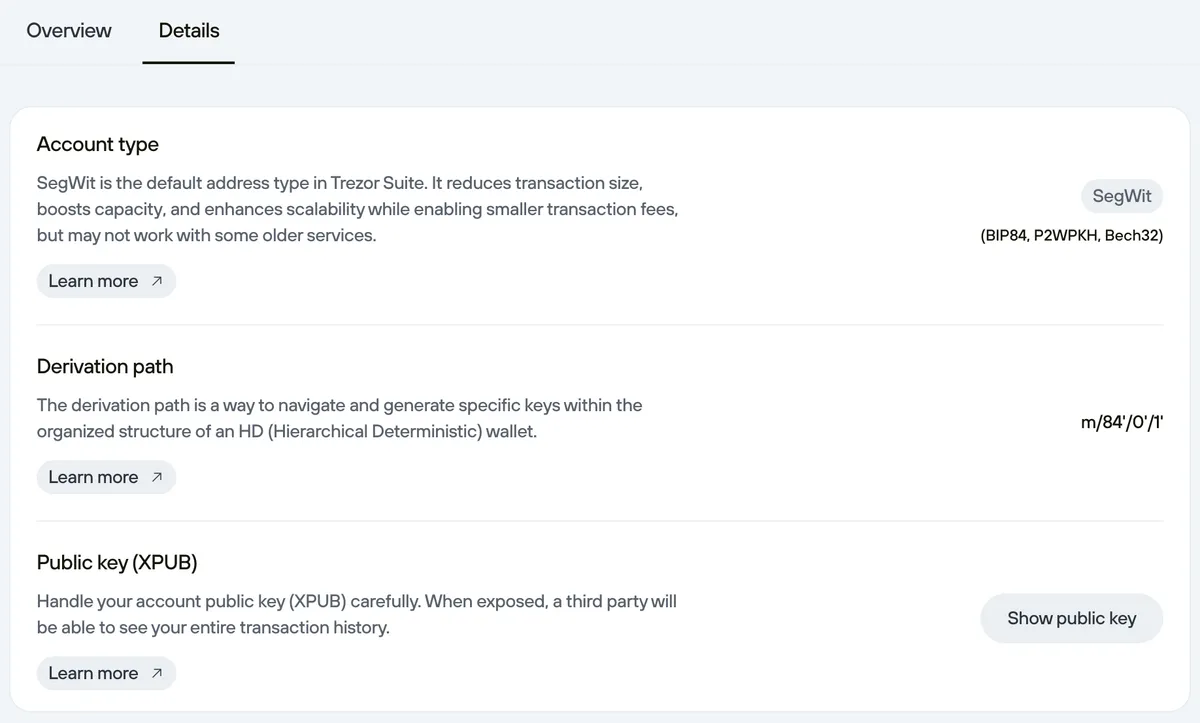
What is an derivation path? A Hierarchical Deterministic (HD) wallet - first proposed in BIP32 - is a wallet which derives all its addresses and keys from a single source, namely the wallet seed. These are organised into a tree-like structure. A derivation path is effectively a series of instructions for navigating the tree and arriving at the extended public key (XPUB) for a specific account. The XPUB can then derive unique public addresses. As implied by the name, the process is deterministic, meaning the addresses generated will be the same regardless of which software you’re using. Handle your XPUB with caution - while it cannot be used to spend funds, it can reveal your transaction history and balance.
With your XPUB and derivation path to hand, you’re ready to generate addresses. You could do this manually in your existing wallet software, or even on the command line using Node or Python, but we’re going to rely on our serverless function to do this on-the-fly.
3.2 Create an address pool
For this example I’ll use Netlify, but the principles are applicable to any modern hosting provider. If you want to get started right away, I’ve created a 1-click deploy button for Netlify here:

The complete code is available here: https://github.com/tombennet/bitcoin-serverless-donations 🚀. Following my example, your function would be accessible at /.netlify/functions/get-address.
How does it work? Your XPUB and derivation path are stored server-side in environment variables, where they can be accessed by your new serverless function without committing them to your codebase:
BITCOIN_XPUB="your_xpub_here"
BITCOIN_DERIVATION_PATH="your_path_here"
Your serverless function called get-address then uses Swan’s XPUB tool to generate a small pool of addresses we can cycle through. Each time a fresh address is picked, we check whether it’s been used using the Mempool.space API. If it has, we generate a fresh address and store that.
You might be wondering how addresses are saved between function invocations - and how we track which is our current address to serve. This is possible thanks to basic key-value storage, provided (in our case) by Netlify Blobs, which can be queried by Netlify functions. You can use a Cloudflare Worker plus Cloudflare KV, or any other similar serverless infrastructure.
3.3 Fetch an address from the browser
Time to build our frontend. We need it to do 3 things:
- Call the endpoint to get a Bitcoin address
- Save the address to the browser’s
localStoragefor 10 minutes (avoiding repeated calls to your endpoint) - Render the saved address to a QR code and create a “Copy” button, using a fallback address if the endpoint failed
If you want full control over the frontend, you can just query your function endpoint within any existing application. But if you’d prefer to get started quickly, I’ve built a ready-to-use JavaScript utility you can drop into any existing project.
<link
  rel="stylesheet"
  href="https://cdn.jsdelivr.net/npm/bitcoin-serverless-donations@latest/dist/bitcoin-pay.min.css"
/>
<script src="https://cdn.jsdelivr.net/npm/bitcoin-serverless-donations@latest/dist/bitcoin-pay.min.js"></script>

<div id="bitcoin-donate"></div>

<script>
  BitcoinPay.render({
    endpoint: "https://your-site.netlify.app/.netlify/functions/get-address",
    selector: "#bitcoin-donate",
    bitcoinFallbackAddress: "bc1q...",
  }).catch((error) => {
    console.error("Failed to render Bitcoin widget:", error);
  });
</script>
It’s also available as an npm package, should you wish to integrate it into your existing project as an ES module. Simply run:
npm install bitcoin-serverless-donationsThen import the script and styles into your project:
import { BitcoinPay } from 'bitcoin-serverless-donations';
import "bitcoin-serverless-donations/css";
The BitcoinPay() function expects four main parameters:
selector: A CSS selector for the element(s) into which it will render the payment widget.endpoint: The full URL of your backend function - by default it will live at/.netlify/functions/get-addresson whichever domain you deployed to.bitcoinFallbackAddress: The Bitcoin address to use if your backend function is ever unavailable. I’d suggest picking the first unused address from the account associated with your XPUB.lightningAddress: Optionally add your static Lightning address here to enable the two panel layout option.
Once added to your page, you’ll get something like this:
You can find a complete, working example - including the serverless function and frontend code - on my GitHub repo. It takes two minutes to spin up a working example.
Very important: It is essential that you verify your function is generating addresses correctly. Users will (hopefully) send Bitcoin to these addresses, so check it’s working before you deploy. Simply open your wallet software, head to the account from which you fetched the XPUB, and make sure that it shows the same addresses as your donation widget.
Congratulations! You’re done. Now you can wait to receive your first Bitcoin payment. This brings me nicely onto maintenance and next steps…
4. How to check your balance
Easy - simply open your Bitcoin wallet and wait for it to scan all your addresses. Because your function generates addresses sequentially, any payments you receive will go to one of the first addresses in the account (assuming a gap limit of 5+).
This is a good opportunity to reiterate the benefits of running your own Bitcoin node. By doing so, you can connect your wallet to your private Electrum server and check the balance of your addresses - and even broadcast transactions - without any reliance on third parties that might compromise your privacy.
There’s still plenty of ways this solution might be extended or improved. The original iteration required addresses to be generated in advance using Sparrow, and had no way to automatically remove used addresses from circulation. If people continue to find this useful, I will continue to improve it! So please let me know if you like it, either by telling me, pinging me some sats, or by subscribing to my email list:
5. Closing thoughts
This approach isn’t for everyone - and that’s the point.
If you need invoices, CMS plugins, or a full point-of-sale app, BTCPay Server is an incredible tool. But if you’re an indie dev, blogger, or builder who’s just getting started with Bitcoin - and you want to avoid middlemen and compromised privacy - this is for you. I believe there’s a niche of independent technical creators who could benefit from a lightweight, free Bitcoin payments solution such as this.
I care deeply about seeing Bitcoin thrive as both a sovereign, peer-to-peer means of exchange and a long-term store of value. I want to do my bit to help that future along.
If this solution works for you, please let me know! I’ll then put more effort into developing this tutorial and the accompanying repository.
Thanks for reading! Happy stacking.