Today I’ll show you how to build your first Bitcoin node using a Raspberry Pi 5 and several off-the-shelf parts. It’s a fun weekend hacking project and a great way to learn more about cryptocurrency, all while contributing to the decentralised network powering Bitcoin.
What’s more, we’re going to create the node to be as small and unobtrusive as possible. That means no external USB drive or monitor, just a single tiny box plugged into Ethernet and power. It’ll be low maintenance, use minimal electricity, and be configurable via web browser or SSH from your computer. I’ll also show you how to connect your Bitcoin wallet directly to your node via Electrum Server, maximising your security, independence, and privacy.
Latest update: Now reflects Raspiblitz v1.12.0!
Let’s get started!
Contents
- Why bother building a node?
- Hardware for your node
- Software for your node
- Step-by-step setup
- Connect your wallet
- Wrap-up & next steps
1. Why bother building a node?
Note: If you’re already sold on building a node, you can to jump straight to the building instructions!
Building a Bitcoin node isn’t something you should do with an expectation of financial reward. With a lot of work and significant upfront capital you might make some money from running Lightning channels, sure, but in general I’d only recommend going into this project if most of the following points apply:
- You like building stuff and want to learn more about Bitcoin.
- You want to participate in the decentralised network powering Bitcoin and help keep the currency transparent, reliable, and secure.
- You’ve already taken custody of your Bitcoin, having withdrawn it from centralised exchanges and moved it into a secure wallet (one where you hold the private keys).
- You want to maximise your privacy by creating and broadcasting transactions directly from your own node, rather than trusting third party services that might compromise your IP or wallet addresses.
What’s the difference between miners and node runners?
Good question.
- Nodes are like the keepers of the ledger. Each node stores the entire history of the blockchain, allowing them to receive and validate transactions and rebroadcast them to other nodes.
- Miners, on the other hand, exist to create new blocks. They listen for transactions, assemble them into blocks, and then expend computational power looking for a nonce value which - when combined with the transactions and hashed with SHA-256 - will result in a number starting with the required number of zeros (known as ‘proof of work’). Successful miners receive a Bitcoin reward for successfully creating a new block.

To be a successful Bitcoin miner in 2025 requires an almost unfathomable amount of cheap energy, or - if you’re a solo Bitcoin miner - a hell of a lot of luck. Standard CPUs and GPUs simply don’t cut it anymore; modern miners typically use dedicated chips known as ASICs (Application-Specific Integrated Circuits).
To run a node, on the other hand, doesn’t require any specialist hardware. It’s possible to run a full node on a 10+ year old laptop. What’s more, using an energy-efficient computer like the Raspberry Pi means your running costs will be just a few pounds per year, even running constantly. The main requirements are (1) a fast and unlimited internet connection, (2) a bare minimum of 1TB of storage.
With that in mind, let’s choose the Node’s hardware.
2. Hardware for your node
I wanted my node to run 24/7, use minimal power, and be as small, quiet, and self-contained as possible. I didn’t want multiple boxes wired together via USB, nor did I want to use a dedicated monitor.
Having explored many different options, I can highly recommend the Raspberry Pi 5 for running a node in 2025. Obviously it’s tiny, which is ideal, and it’s more than powerful enough to run a full node. Best of all, version 5 of the Pi has a PCI Express 2.0 interface, meaning it can support an M.2 NVMe internal SSD. This eliminates the need to store the blockchain on a bulky external USB drive.
Here’s what you’ll need:
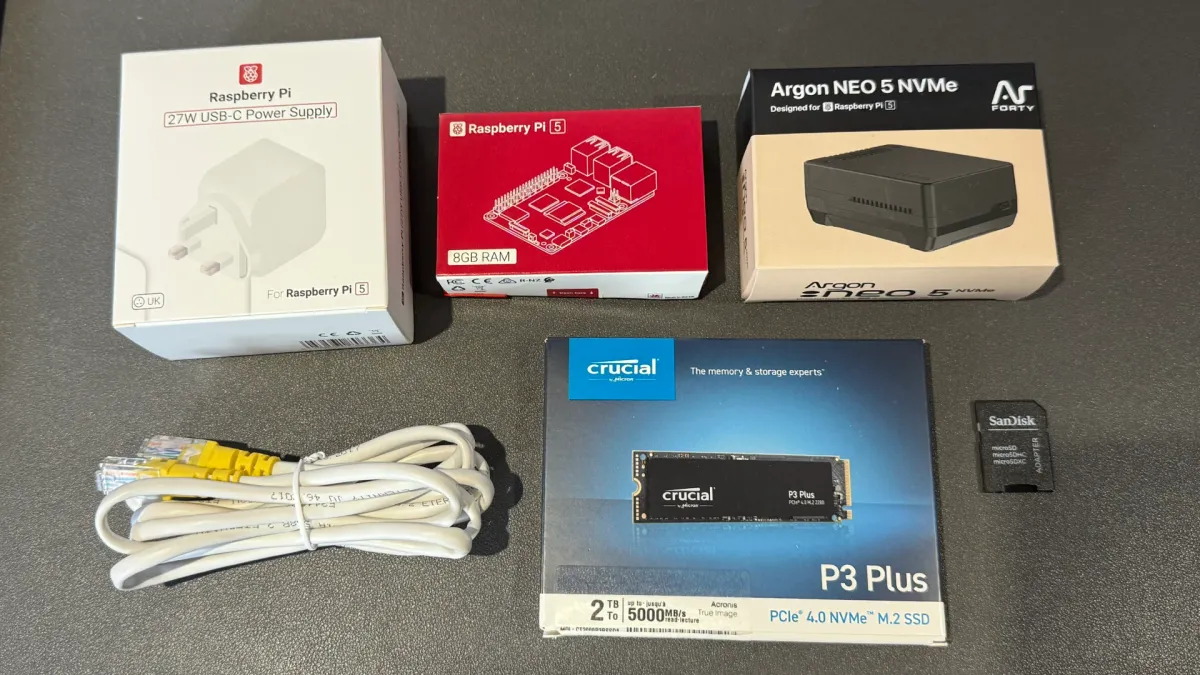
- Raspberry Pi 5, 8GB RAM - £75 (The Pi Hut, Pimoroni)
- Raspberry Pi 27W USB-C Power Supply - £10 (The Pi Hut, Pimoroni)
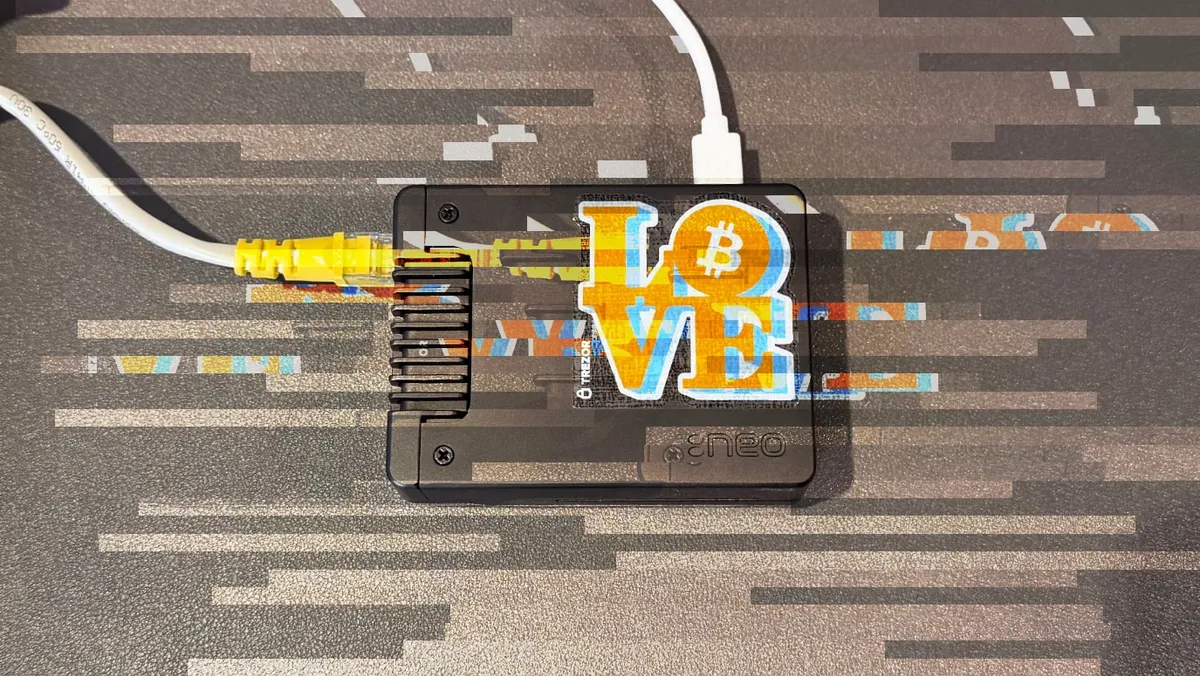
- Argon NEO 5 M.2 NVMe Case - £30 (The Pi Hut, Pimoroni)
- M.2 NVMe PCIe Internal SSD, 2TB - £110 (Overclockers)
- MicroSD card, 64GB - £10 (The Pi Hut, Pimoroni)
- Ethernet cable - £2 (The Pi Hut, Pimoroni)
All links above go to good independent UK sellers.
Some important points to remember with M.2 NVMe-based builds:
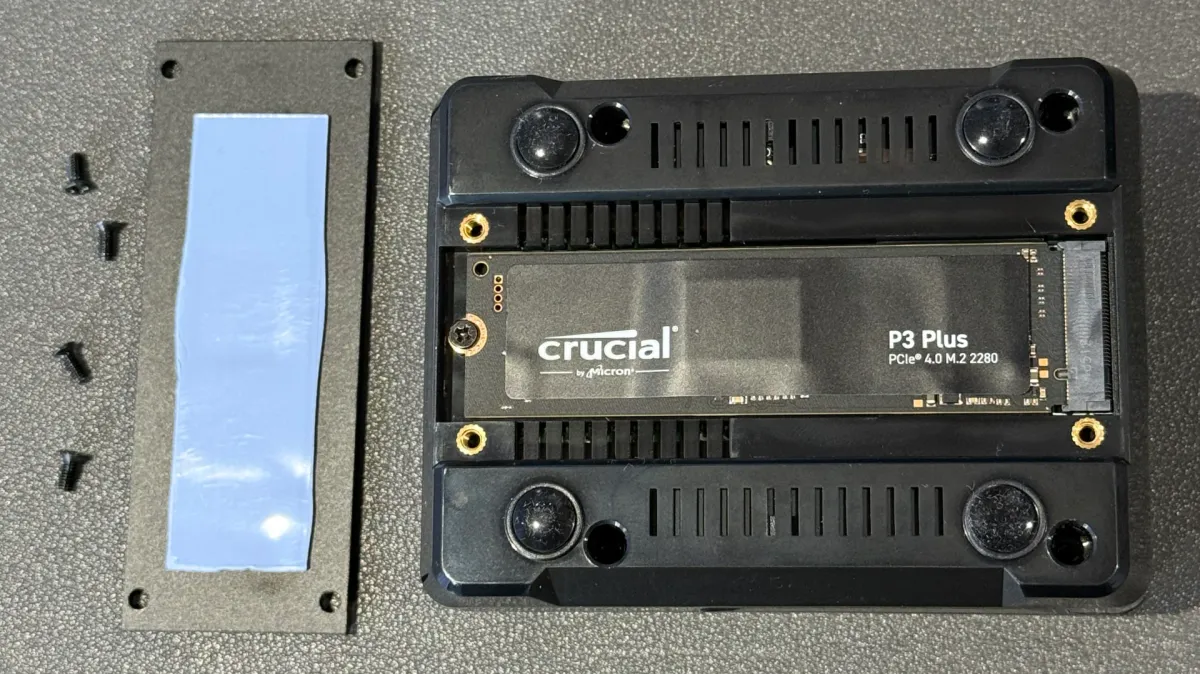
- Not all NVMe drives are fully compatible with the Raspberry Pi 5. Certain controllers are known to cause issues. Pimoroni maintain a helpful compatibility list on their NVMe base page, which I’d recommend you review. I bought a Crucial P3 Plus SSD 2TB M.2 NVMe PCIe Gen4 SSD, which I can confirm works perfectly.
- There are lots of good Raspberry Pi cases which can accommodate an M.2 chip up to a 2280 size. Some require you to also buy a compatible PCIe extension board. The Argon case I’ve recommended above includes the NVMe board, connectors, heatsink, and even a tiny fan, meaning it’s got everything you need to get started.
- For this build, we’ll boot the system from the NVMe drive and store the blockchain data there too. The SD card is only required for the initial install; you can use it for something else afterwards.
- Don’t skimp on the power supply. Shoddy third-party USB-C chargers are a leading cause of issues with builds like this. Get the official Pi 5 27W supply.
All in, you’re looking at £235 in total if you buy new. If you already have a Raspberry Pi, power supply, ethernet cable, and microSD card available from a previous project (as I did), then your main expense will be the NVMe SSD at around £110, plus a case if you want a nice tidy build.
Don’t be tempted to get a 1TB SSD - you might save about £50, but your drive would be over three-quarters full on day 1, given the present size of the Bitcoin blockchain. 2TB is a future-proof option. You could also skip the case, but then your components would get dusty and - if you’re not fussed about having a small, self-contained build - you’d be better off getting a USB SSD rather than an NVMe internal SSD.
Before assembling the hardware let’s consider software options, because your decision here affects the order of the steps to take.
3. Software for your node
Broadly speaking, all node software options sit somewhere on the spectrum between plug ‘n’ play versus fully DIY. In that order, here are four good free options:
- UmbrelOS, is a polished, Debian-based operating system designed to turn a Raspberry Pi into a personal server. It’s not Bitcoin-specific - its app store includes a wide range of self-hosted services, from media servers to privacy tools. It’s open source and free to use, and well-suited to users who don’t feel comfortable on the terminal.
- MyNode installs multiple Bitcoin-related apps via a Docker container, and it makes everything accessible via a local web server or SSH. You can install it via SD card image. While many of the included packages are open source, MyNode itself is not. The GUI is good, albeit not as polished as Umbrel. There’s a free “community” edition which boasts many great features, along with a “premium” option that unlocks paid support plans and remote access via Tor.
- Raspiblitz is a collection of open source Bitcoin software provided via SD card image. They provide both a ‘beginners’ image, which installs many packages and assumes you’ll run an LCD screen on your node, and a ‘minimal’ version, which I prefer. This comes with only the essentials. Without a screen, access is via a (wonderfully designed!) SSH interface and - optionally - local web server.
- Raspibolt is a fantastic tutorial by Stadicus which uses standard Debian packages to configure a Bitcoin node entirely via command line. It’s similar to Raspiblitz in some respects, though you’re effectively doing everything yourself rather than relying on an SD card image to get you started. The main drawbacks are that it’s slightly out-of-date and is designed around the Raspberry Pi 4, meaning there’s no guidance on NVMe drives. But if you’re technically proficient enough to opt for this option, neither of those things should be a blocker.
For this build I wanted something actively-developed, Bitcoin-specific, and sufficiently DIY that I can debug it myself. My previous build used MyNode, but I found the heavy, Docker-based approach added layers of complexity on top of Debian that I struggled to work with, even with ChatGPT’s help.
For this reason, we go with Raspiblitz…
A few notable features:
- Electrum Server, allowing you to connect your wallet to your own node
- BTC RPC Explorer and Mempool, so you can explore the blockchain and pending transactions in real-time
- Ride the Lightning and LNBits, so you can manage your Lightning channels and easily send/receive payments
I find Raspiblitz - specifically the ‘lite’ version - offers the perfect balance. It’s lightweight and geared around SSH access, while also being far quicker to setup than more hardcore DIY options.
One last thing before you start: harden your security
A tip from Stadicus which I’d echo here: take this opportunity to harden your network security before you start. If you’re going to run a public Bitcoin node on your home network, then it’s prudent to ensure basic security measures are in place first. These include changing your router’s default SSID and password, updating its firmware, disabling insecure protocols like WPS and UPnP, and enabling strong encryption.
4. Step-by-step setup
Prep your microSD card
As of Raspiblitz version 1.12.0 (released in September 2025) it’s possible to boot and run your system from the NVMe drive and store the blockchain data there too. This means your microSD card is only required for the initial installation.
The microSD card won’t be easily accessible once your case is screwed together, so preparing your card should be your first step.
Download and install Etcher (or Raspberry Pi Imager) onto your main computer - this will help us flash our MicroSD card. Next, head to the Raspiblitz downloads page and download the latest version of the ‘Minimal’ image - you don’t need the ‘Fatpack’ image. The SHA256 hashes of the images are available on that same page for you to verify against. Connect your microSD card (via SD card slot with microSD adaptor or USB card reader as required), then start Etcher.
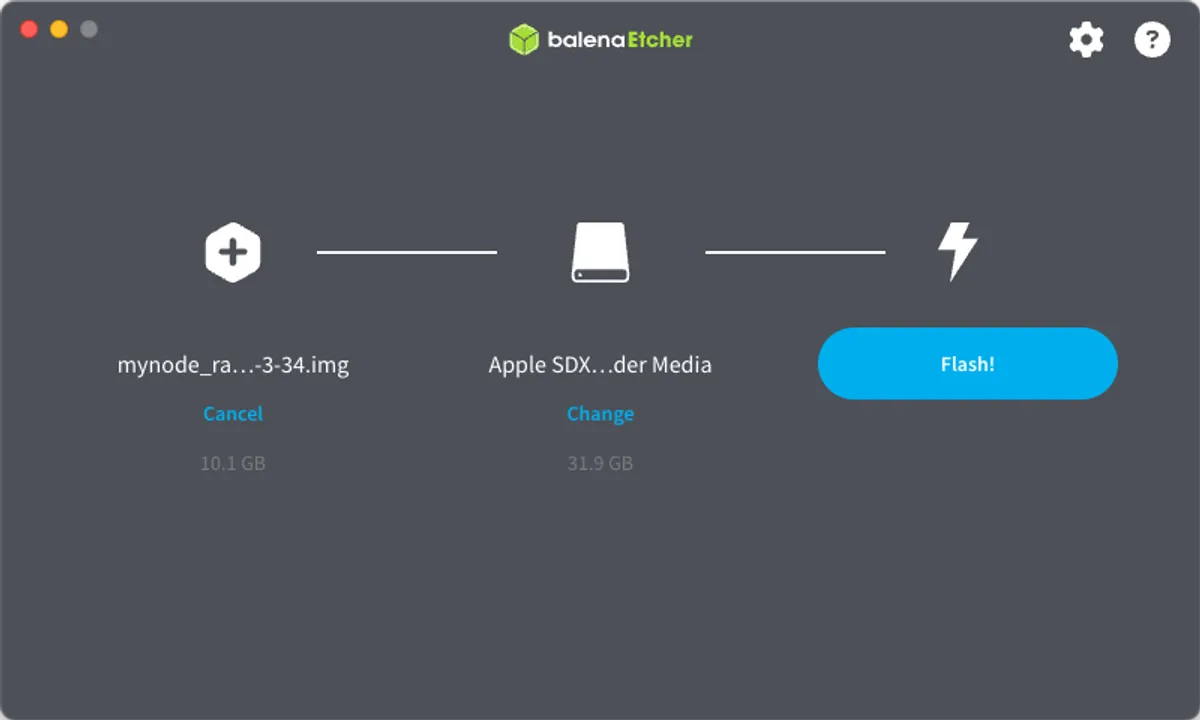
The software’s fairly self-explanatory. Select the Raspiblitz image you downloaded, your microSD card, and then hit “Flash”. When the process is finished, remove the card and insert it into the slot on your Pi. Leave the Pi powered off for now.
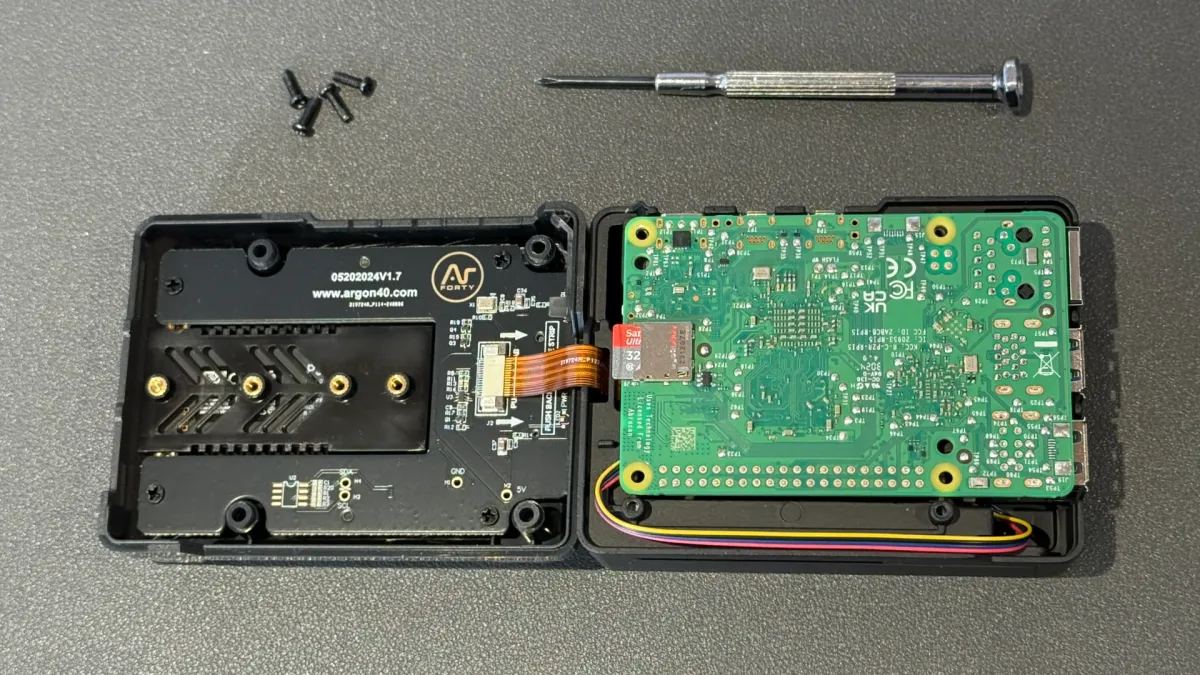
Assemble your hardware
The Argon NEO 5 M.2 NVMe Case I’ve recommended includes a good set of instructions, but I’d suggest watching this YouTube video to familiarize yourself with the fiddliest parts of the process:
In short, your main steps are:
- Connect the fan cable to your Pi’s fan port
- Attach the provided thermal pads to the Pi’s CPU and PMIC chips
- Connect the PCIe flex cable to the Pi, taking great care when releasing the cover and then when locking the cable in place
- Place the Pi into the top part of the case, guiding the fan wire along the inner edge - double check your SD card is inserted, too
- Secure the other end of the PCIe Flex Cable to the case’s NVMe Expansion Board, again taking great care with the port covers
- Attach the bottom part of the case to the top part, being careful not to dislodge or damage the flex cable, and secure case with 4 screws
- Install your M.2 NVMe drive to the bottom of the case, ensuring it is fully inserted into the slot, and secure it with the provided screw
- Apply the thermal pad to the NVMe drive and screw the heatsink into place
- Slot the top cover into place and secure with screws
The fiddliest parts of this process are securing the ribbon cables (you need to carefully release the slot cover first, then lock your cable into place) and installing the M.2 drive (it needs to be inserted at a 30-degree angle to properly engage, then pushed flat to be locked into place with the screw).
Find IP and connect via SSH
Time to power up! Connect your node to your router via ethernet cable, then attach the USB-C power adaptor and switch it on at the mains.
Once your Pi’s powered on, Raspiblitz will start immediately. Since we’re not running a screen with our node, we will access it via SSH and local web server. The “minimal” version of the software doesn’t enable web server by default, so first we need to figure out the IP which your router has assigned it.
Login to your router’s admin panel and find the list of Ethernet-connected devices. Alternatively, on a MacOS or Linux-based device, you can run arp -a in the terminal to see this list. Your Raspiblitz’s IP will start with 192.168..
Open a terminal on another computer connected to the same network and type:
ssh admin@[your Raspiblitz IP address]You might be asked if you trust the device. Enter ‘yes’, then enter the default password which is raspiblitz. This will start the setup wizard.
Normally this is the point in NVMe-based Pi builds where you need to configure the bootloader to recognise your NVMe drive. But thankfully the latest Raspiblitz images include the necessary config changes in the OS, so you don’t need to do anything extra! ✨ If for whatever reason you did need to troubleshoot NVMe drive detection with the Argon NEO 5 case, this is a helpful guide.
Initial Raspiblitz setup
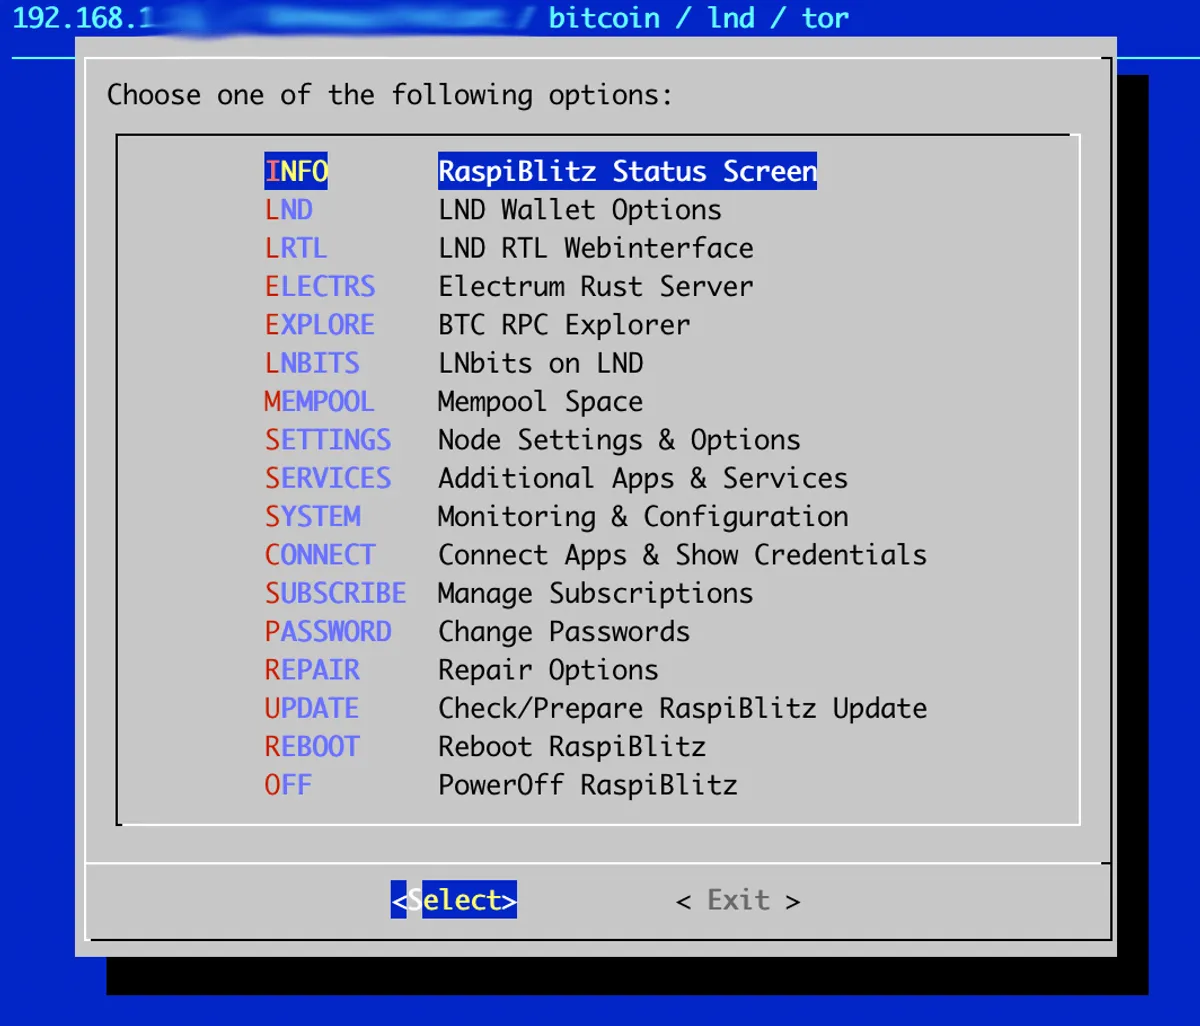
The setup wizard is excellent - like the menu from an old-school DOS game. Navigate with the arrow keys on your keyboard, and hit enter to make a selection.

The Raspiblitz documentation is good, but I’ll give a rough outline of the steps you need to take:
- Setup type: select
FRESHSETUP. - Install type: as of
v1.12.0, you’ll be given the choice between running from the SD card (old style) or from the NVMe drive (new option). Choose the NVMe option, and Raspiblitz will copy itself over to your drive - your system will then restart before continuing setup. - Format drive: Assuming you’ve used a fresh SSD with no blockchain data on it, you’ll be asked if you’re okay with the drive being formatted - this is fine, so select
DELETE DATA. - Choose name: Name your Raspiblitz! If you decide to run a Lightning Node as well, it will be your node name. Choose something non-personally-identifiable but memorable.
- Lightning type: When prompted to choose a Lightning Client, I’d recommend choosing
NONEif this if your first node. You can always setup Lightning later once your main node is up-and-running.- If you do want to run Lightning immediately, hit
LND(Lightning Network Daemon) - you’ll be guided through wallet setup later in the process. Write down your seed words on paper and keep them safe.
- If you do want to run Lightning immediately, hit
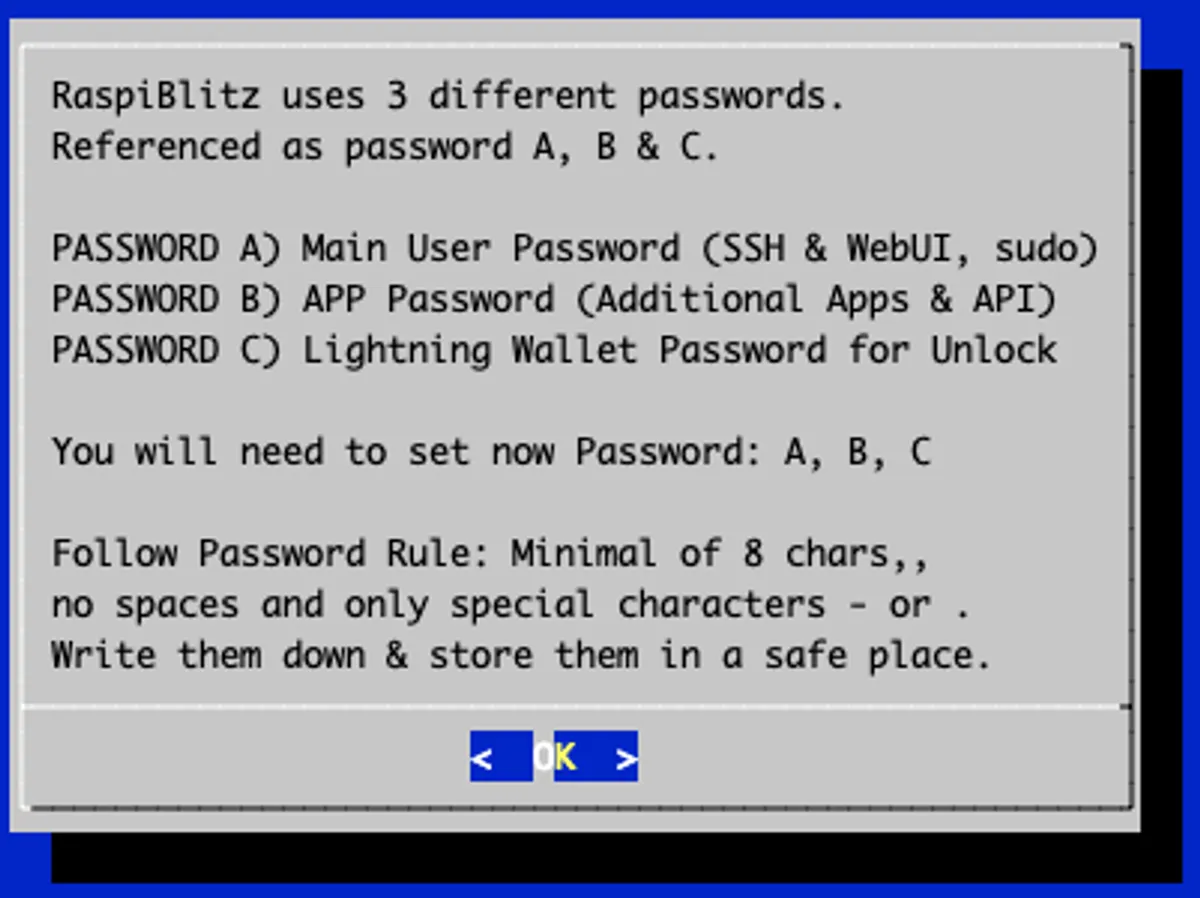
- Choose passwords: You’ll need to choose multiple passwords (three if you chose to create a Lightning wallet). A and B are the main user password (SSH,
sudo, etc) and the app password (any programs needing a separate login, like Ride the Lightning). Write these down.
Once that’s done, Raspiblitz will run through its install scripts and provision all the necessary services.
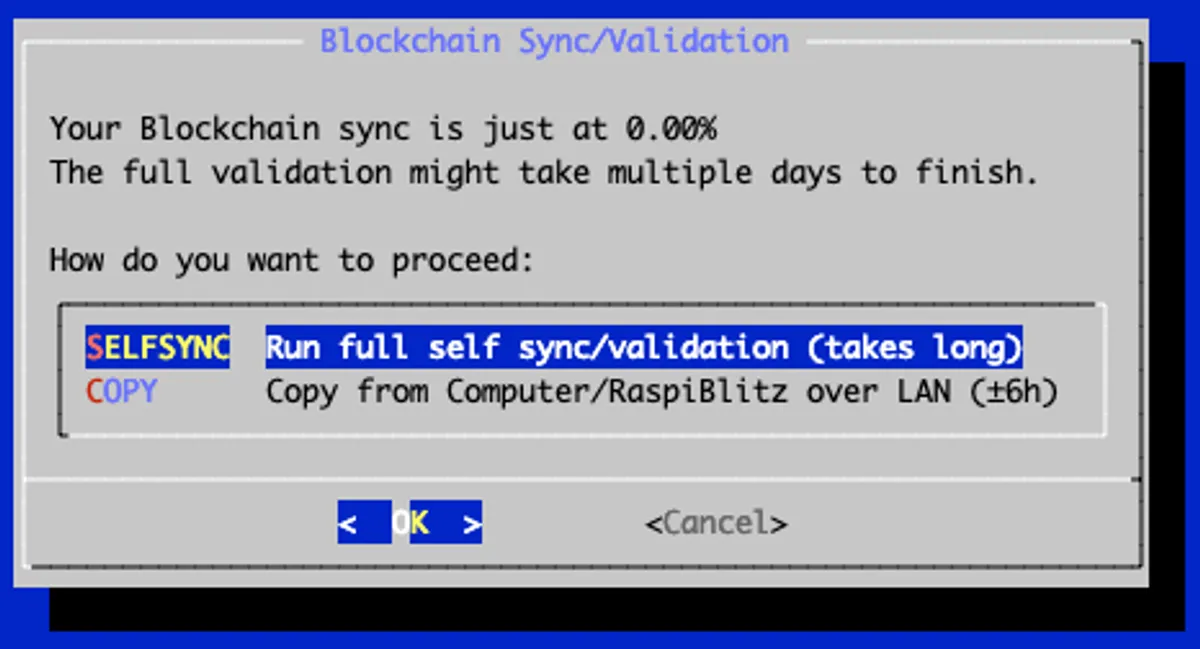
You’ll then be asked how you want to get your copy of the Bitcoin blockchain: SELFSYNC or COPY. Assuming this is your first Node and you don’t have a friendly neighbour who loves Bitcoin and is good with Linux, you’ll want to choose SELFSYNC. This means downloading the entire chain, which comes in at almost 800GB at time of writing. This process - referred to as Initial Block Download, or IBD - can take up to a week depending on the speed of your internet connection.
There’ll be one final reboot, at which point you’ll be kicked out of SSH. Log back in (using your Password A), and you’ll be presented with NODE IS SYNCING and a progress percentage. This will take days - you can exit the screen with CTRL+C, and you’ll land on the terminal. Type exit to leave SSH. Your Pi will continue run as it downloads the blockchain.
Since you’re now sat twiddling your thumbs, it’s worth considering what an incredible process this is. Your Node is fetching the entire history of the blockchain, including every Bitcoin transaction ever made, from other peers like you. Once complete, its records will go right back to 12th January 2009, the date on which Bitcoin’s creator, Satoshi Nakamoto, transferred 10 bitcoins to American cryptographer Hal Finney, completing the first ever Bitcoin transaction. Your node will check the integrity of this data, and - crucially - use it to check the validity of new transactions it receives.
Raspiblitz configuration
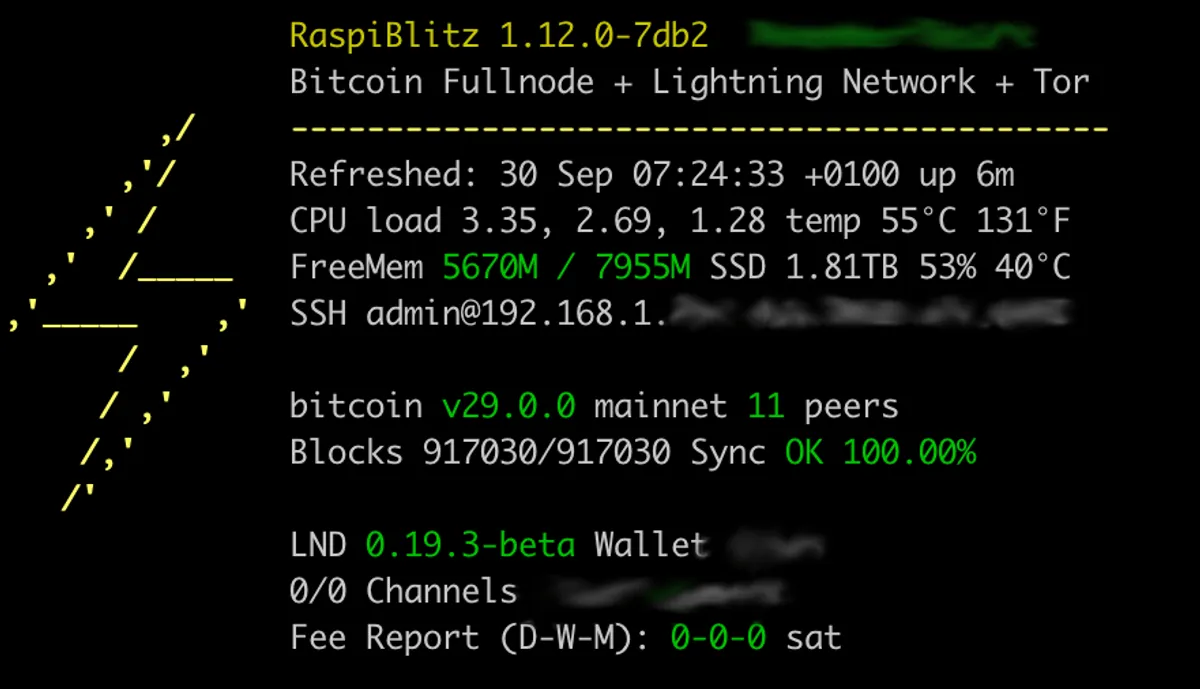
A few days later, once the blockchain sync is complete, you’ll see the awesome Raspiblitz homescreen when you SSH into your device:
Yours will have fewer options at first - I’ve added a few extra packages to mine, some of which add options to the main menu. A guide to the Raspiblitz SSH menu is available on the official website, so for now I’ll highlight a few of the key options to be aware of:
- Settings: Here’s where you can enable the local server and web UI if you want to. It’s the top option - just hit space, then select OK to install. It’s also where you can enable Tor for your node, if you want to.
- This is also where you’ll find the (experimental) option to run Bitcoin Knots, an alternative to Bitcoin Core. I’ve had several queries relating to the Core vs Knots debate, so I’ll share my two cents here. I believe diversity is good for the Bitcoin project; our opinions may differ on the best balance between censorship resistance versus spam resistance, but ultimately all Bitcoiners want the same thing: sound money. While I wouldn’t personally recommend running Knots due to the myriad of security concerns surrounding the project and its maintainer, I think it’s cool that Raspiblitz gives users the option to do so.
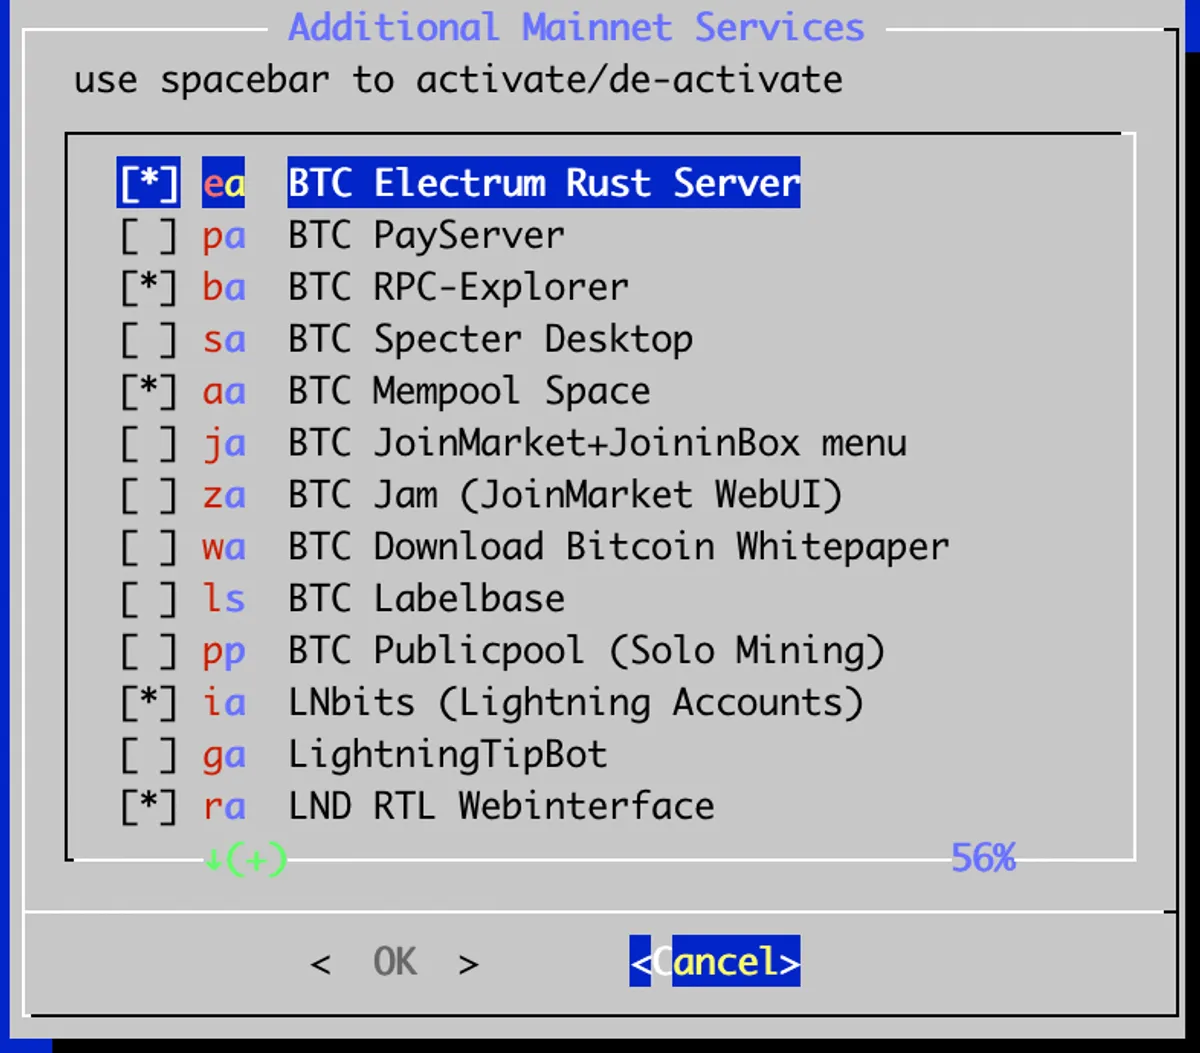
- Services: This lets you choose new software to install. The lite version of Raspiblitz is super lean, so any extras you want like RPC Explorer, Mempool, Electrum Server can be installed here.
- System: Monitoring and advanced configuration. If you want to view or edit your
bitcoin.conforlnd.conffiles, this is the place to do it.
The last thing I’ll recommend before we move on is to consult the official Raspiblitz FAQ. Here you’ll find useful guidance on things like version upgrades, router configuration, and debugging.
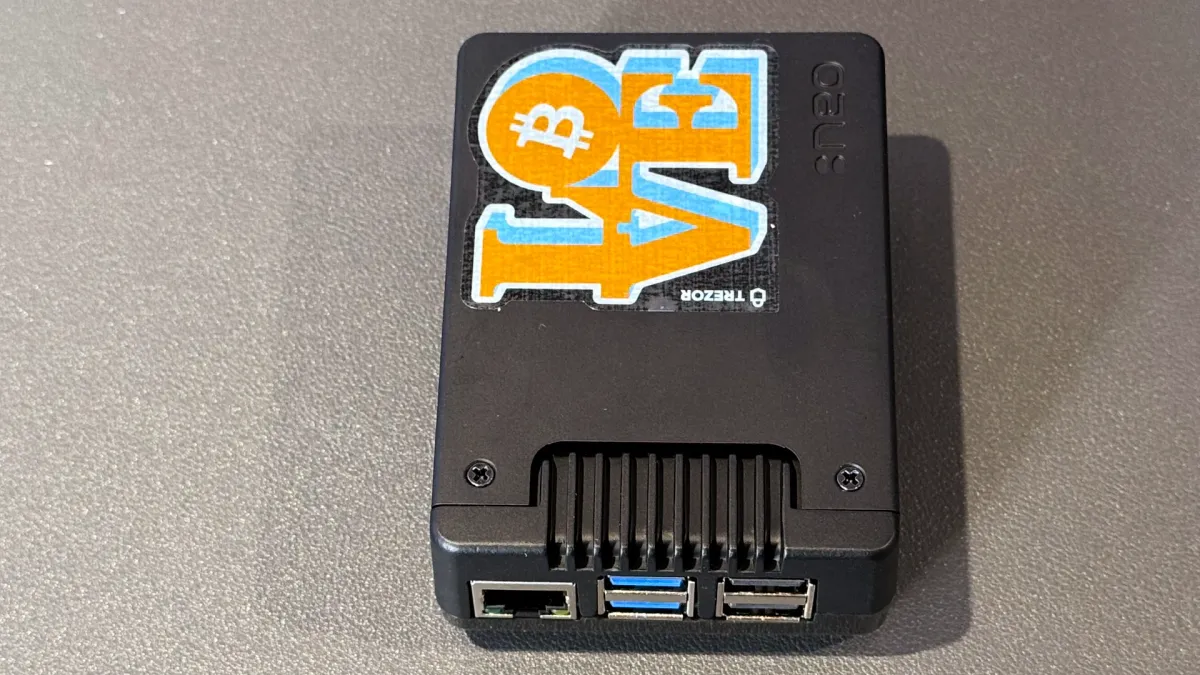
Congratulations! You’re now running a full Bitcoin node with a full copy of the Bitcoin blockchain, and it’s actively validating and re-broadcasting transactions on the peer-to-peer network. You can now remove your microSD card - keep it aside for future Raspiblitz upgrades.
The final topic I’ll cover involves connecting your Bitcoin wallet to your node, enabling you to execute transactions without any reliance on a third party.
5. Connect your wallet and send some Bitcoin
Why connect your wallet to your own node?
Every time you check your wallet balance, it has to query a node to get that information. It asks the node for the balances of each of your addresses, and in so doing reveals your IP address and total Bitcoin holdings to that node. By using onion routing (i.e. Tor), you can protect your identity to a degree, but it’s still possible to link your addresses together.
When you connect your wallet to your own node, you’re instead querying your own local copy of the blockchain. There’s no need to trust any third party; your node can answer questions about transactions, addresses, and balances. What’s more, it’s possible to broadcast your own transactions without revealing anything about yourself - you relay the transaction to your node, which will mix it in with the thousands of other transactions it’s received, and then rebroadcast all of them. You can read more about the privacy benefits of being a node runner on Bitcoin.org.
To let your wallet communicate with your node, we’ll use Electrum Server, and to let you explore the blockchain securely, we’ll use Bitcoin RPC Explorer.
What is Electrum Server?
Electrum server acts as a piece of middleware to let your wallet connect to your node. It effectively tracks the subset of blockchain activity which is relevant to your wallet’s addresses, and indexes them for faster querying.
Most popular wallets are compatible with Electrum server, including Electrum, Sparrow, Trezor, and many others.
Under the hood, Raspiblitz is actually going to install Electrs - a fast, Rust-based re-implementation of Electrum Server that’s specifically designed for use-cases like this.
Enabling Electrum Server & RPC Explorer on Raspiblitz
Login via SSH, head to the Services screen, and hit space to enable BTC Electrum Rust Server. It should be the top option. Scroll down to BTC RPC-Explorer (the third option in my version) and enable that too. Hit OK, and wait for these packages to finish installing.
Once it’s completed, don’t try to connect your wallet immediately. Electrs needs to fully index the blockchain before it’s ready, a process which can take hours or days depending on hardware. With this build, I left it running overnight and it was ready by morning. You can check its progress by opening the new ELECTRS item on your homescreen!
Once it’s done, you’ll be able to open this screen:
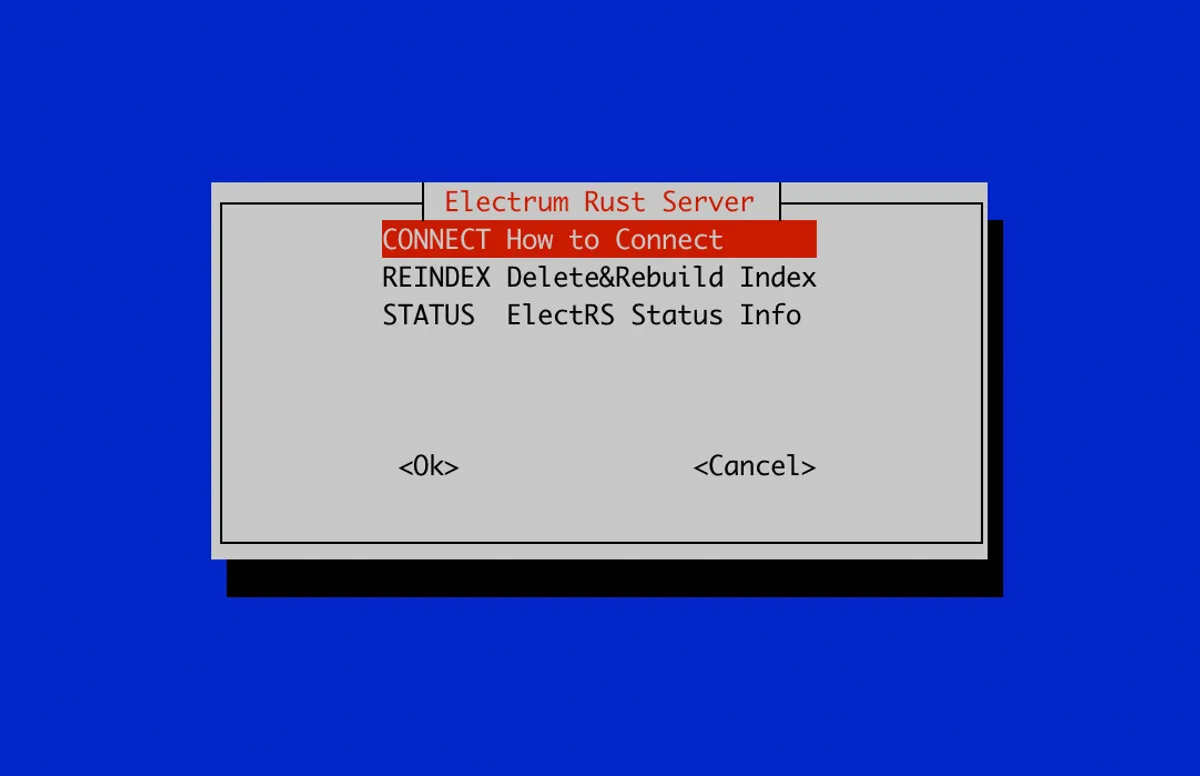
Hit CONNECT to open the instructions screen:

You need to make a note of the IP address, port, and protocol - I’ve circled them in orange. Note that if you’ve enabled Tor in Raspiblitz, you’ll have the option of connecting to Electrum Server via Tor. Since we’re only going to be accessing Electrum via our local network for now, you can safely use the internal ‘clearnet’ IP.
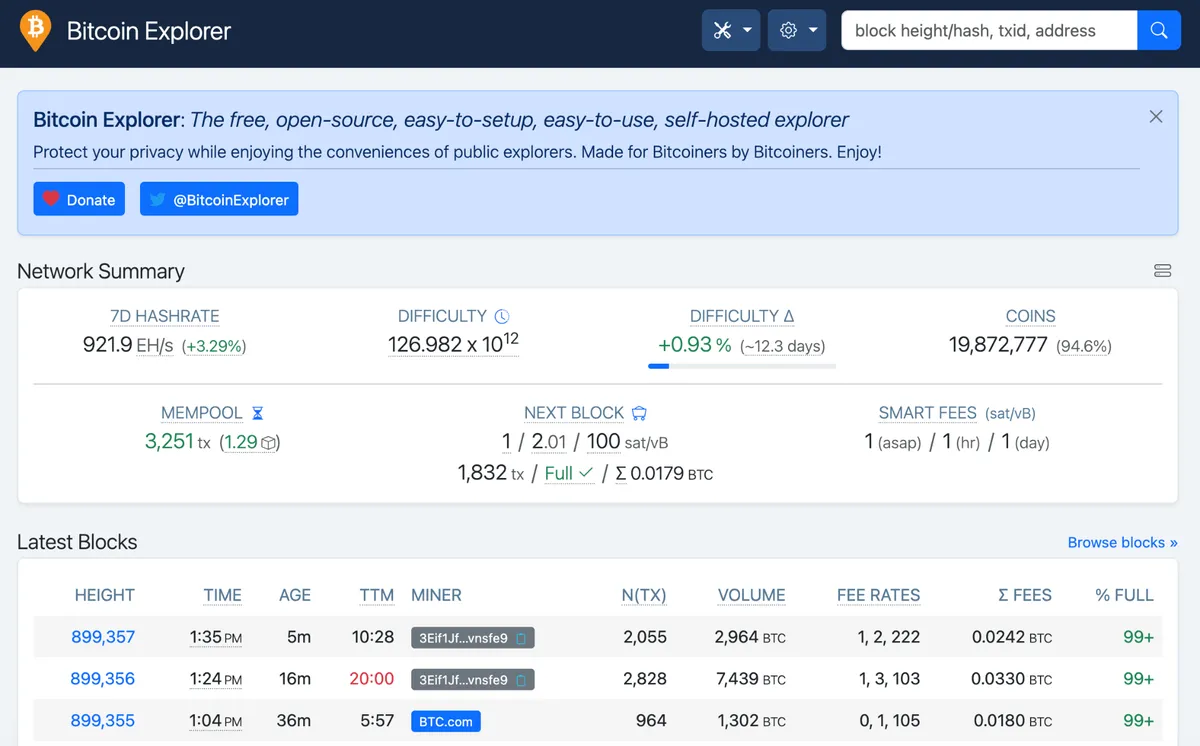
Press Enter to return to the main menu, and then open BTC RPC Explorer. You’ll see another local IP ending in port :3020, this one corresponding to the local web server which is running your blockchain explorer. Make a note of this too, and open it in your browser if you like!
With these two addresses - Electrum Server and RPC Explorer - you’re ready to connect your wallet.
Connecting your wallet
Electrum Server is a widely-used standard, and many wallets are compatible with it, but the connection process varies based on which wallet you have. Guides for Sparrow wallet and Bitbox are available from the creators of those wallets.
For the rest of this guide, I’m going to focus on the process for Trezor.
If you click a link to Trezor’s website on this page and buy something, it earns me a small commission - this helps to fund the continued development of this site. This has no editorial effect on my guides - I only recommend products I use myself.
So - why Trezor? I’m a strong advocate for Bitcoin self-custody with a hardware (cold) wallet, and Trezor make an excellent entry-level device, namely the Trezor Safe 3. They also have a great higher-end wallet with quantum-ready cryptography: the Trezor Safe 7.
All these devices use the Trezor Suite desktop application. Note that the process I’ll outline is not compatible with the Trezor Suite web app - you’ll need the desktop application, running on the same local network as your node. You should also disable Tor in Trezor Suite, if you’ve enabled it, because we’ll be connecting to our node via a regular connection, as I mentioned previously.
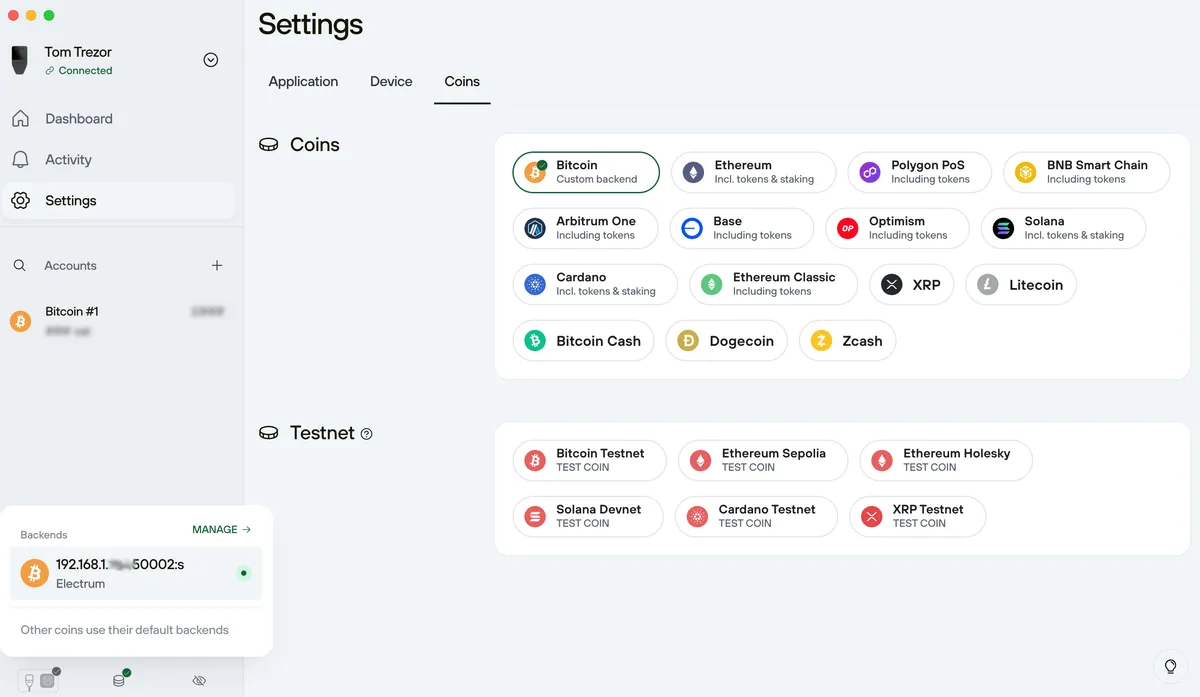
Head to Settings > Coins, and hit the cog next to Bitcoin.
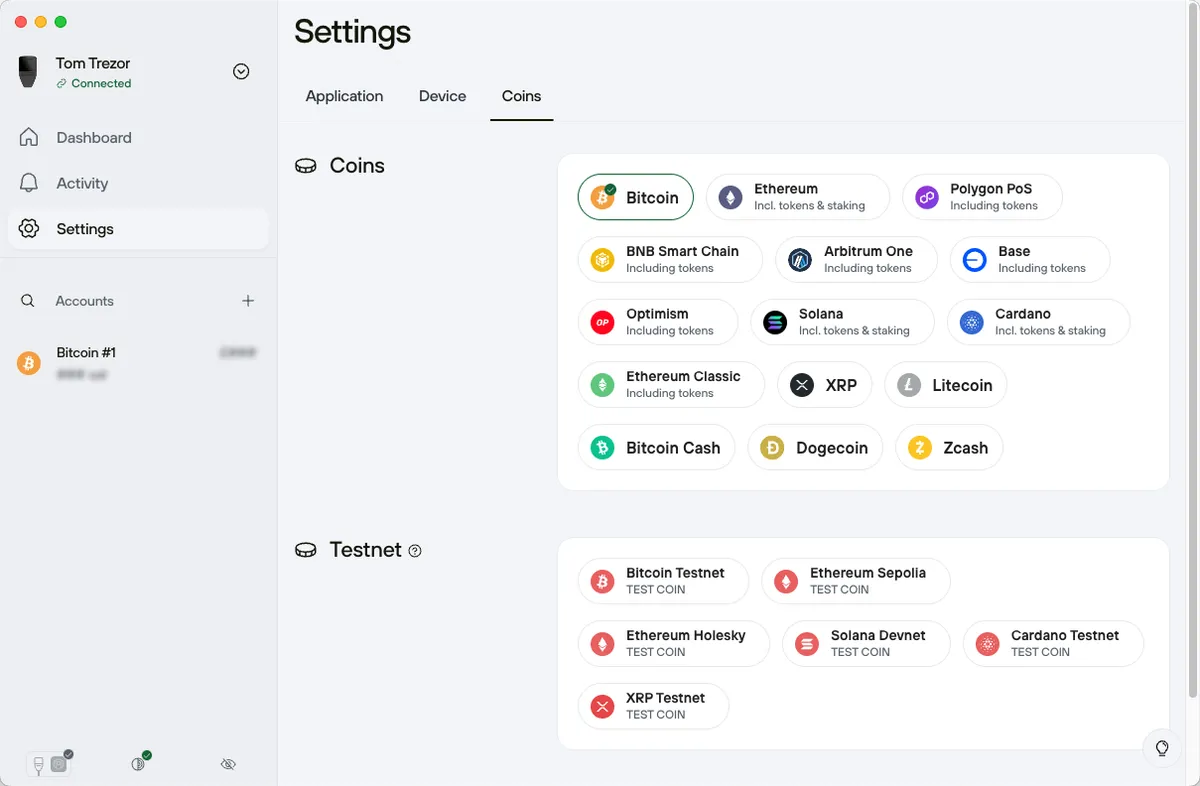
This opens the Bitcoin Backends configuration. By default, Trezor Suite connects to the network using Trezor Blockbook, but it’s trivial to configure the software to instead connect to your Electrum server.
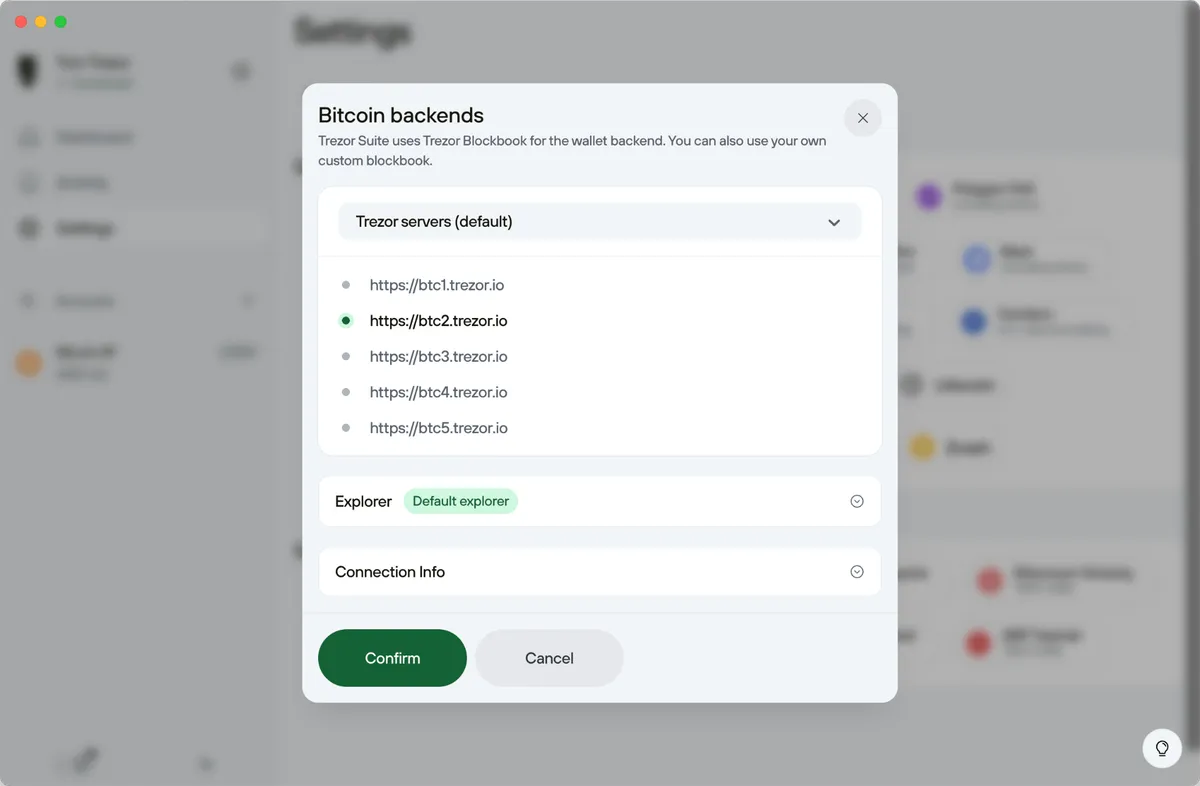
Open the drop-down, and change it from “Trezor servers (default)” to “Custom Electrum server”. The address field expects a string following the format address:port:protocol, which is exactly how Electrs on Raspiblitz provided it for us.
- Address: The IP address of our Raspiblitz node, starting with
192.168.. - Port: The port on which Electrs is accessible - for secure connections it’ll be
50002. - Protocol: It’ll be
sfor secure.tis for plaintext connections.
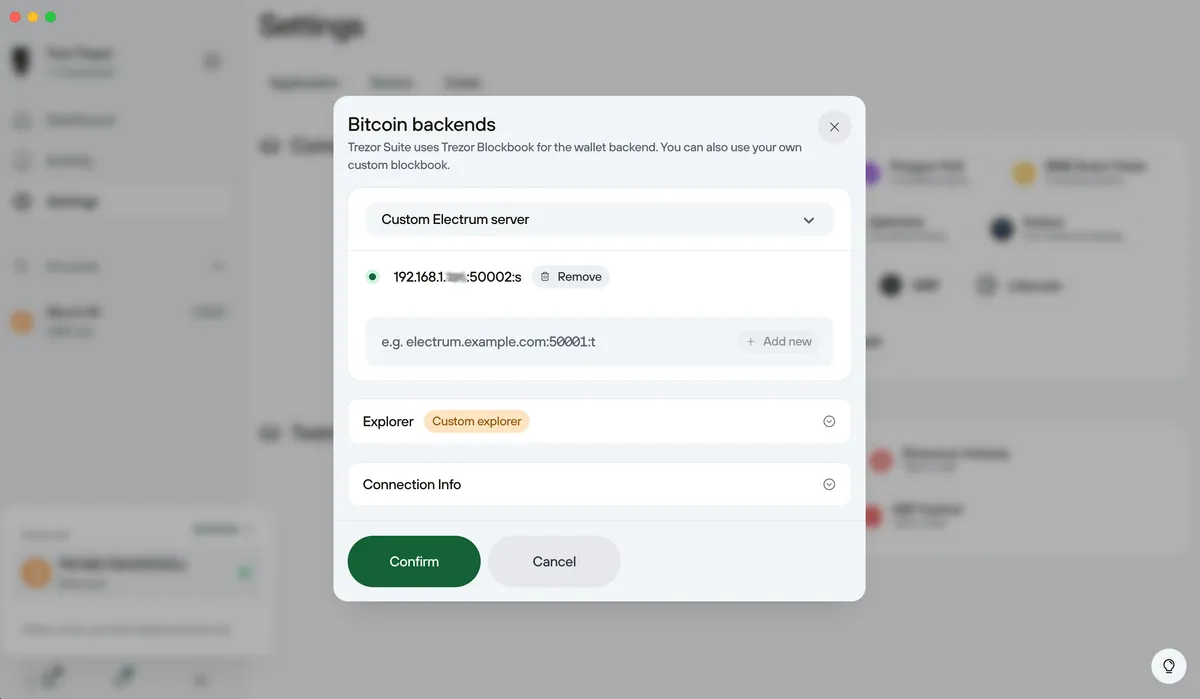
Don’t close the window just yet; scroll down to Explorer. While you’re here, you may as well tell Trezor Suite to use your own node for blockchain exploration, too! Change the “Root URL” to the BTC RPC Explorer URL you noted down earlier (the one ending in :3020). There’s no need to change the paths - these are the same as Trezor’s defaults (tx, address, etc).
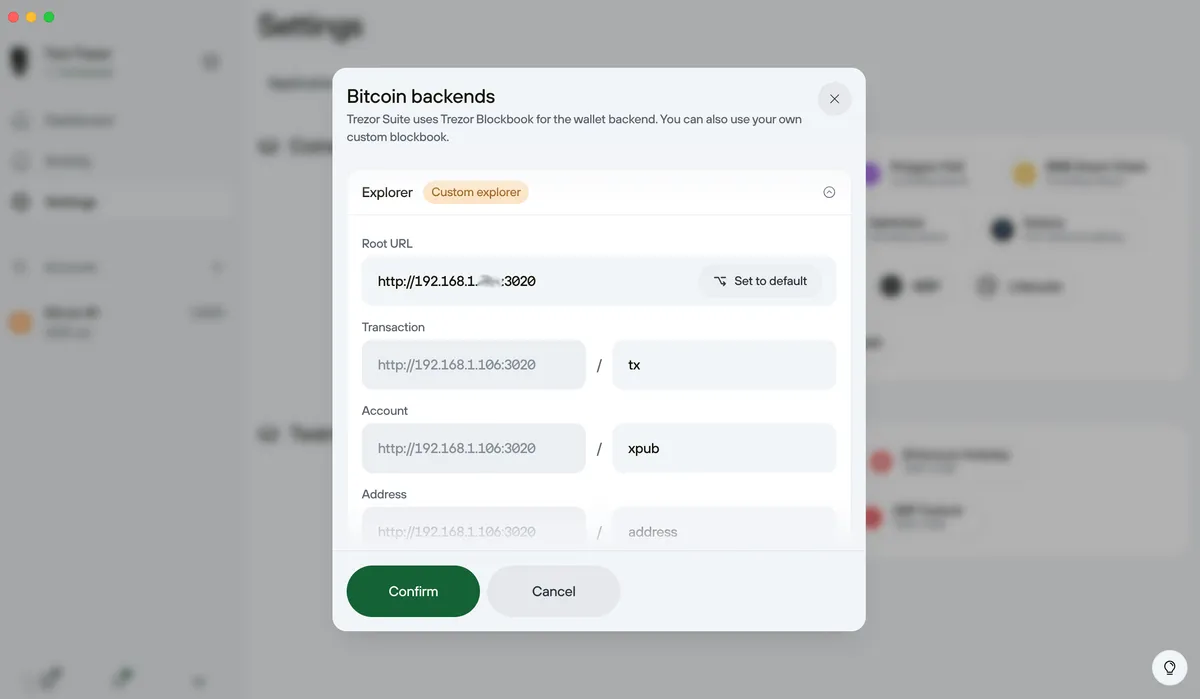
Hit “Confirm”, and wait for Trezor to connect to your Electrum server. You’ll know it’s succeeded when the Bitcoin Backends view (accessible via the database icon in the bottom left) shows a green light next to your URL.
You’re done!
Your Bitcoin wallet’s software is connected to your own sovereign node. You’re able to securely send and verify transactions, and explore the blockchain, without trusting any third party or revealing anything about yourself. More than that, you’re also taking a more active role in the evolution and direction of the Bitcoin project.
6. Wrap-up & next steps
One of the cool things about this project is its extensibility. You’re running a full sovereign Bitcoin node and have connected your wallet to it, greatly enhancing the security and privacy of your transactions, but there are dozens more avenues to explore:
- Enable Lighting: Explore Bitcoin’s first layer 2 protocol, and discover how the Lightning network enables faster and cheaper transactions off-chain
- Explore the Mempool: Enable Mempool Explorer on Raspiblitz so you can see transactions being broadcast, mined, and confirmed in real-time on your own copy of the blockchain
- Enable remote access via Tor, enabling you to access your services (RPC Explorer, Electrum Server, Ride the Lightning) from anywhere in the world
- Trade Bitcoin P2P: P2P Bitcoin exchanges like Bisq enable users to buy and sell Bitcoin in an entirely decentralised way, and can be configured to connect to your own local node
If Raspiblitz works well for you, I’d encourage you to donate to their development team. It’s a fantastic project that’s very deserving of any sats you can spare.
If you found my guide useful and want to buy me a coffee as well, I will accept the beverage with gratitude:
If you have any feedback or suggestions, you can email me at hello@bennet.org. You can also choose to be notified via email next time I publish an article on Bitcoin.
Thanks for reading!