
In this guide, I’m going to show you how to build a system for accepting Lightning payments via your own node. It’s free to operate, fairly low maintenance, and privacy-centric. It’s potentially a good solution for anyone who already runs a Lightning node and who - for whatever reason - doesn’t want to use a static address offered by one of the main wallet providers.
In my case, I developed this system as part of my ongoing technical journey down the Bitcoin rabbit hole. It’s definitely a good way to learn more about the Lightning network.
Contents
- Prerequisites: what you’ll need
- Installing LNBits on Raspiblitz
- Setting up a Cloudflare tunnel
- Implement QR code client-side
- Tighten your security
- Wrap-up & next steps
1. Prerequisites: what you’ll need
A. You need to be running a Bitcoin and Lightning node more or less 24/7. If you’re not yet doing that, I’ve written a separate guide on how to set up Raspiblitz on a Raspberry Pi 5. It’s fine if your node runs something other than Raspiblitz - as long as you’re able to install LNBits and a Cloudflare tunnel, the steps will be largely the same.
B. The DNS settings for your domain need to be managed on Cloudflare. This might seem like a hassle if you’re not already using Cloudflare, but it’s very easy to switch, will likely cost you nothing, and can be done with zero downtime.
C. Familiarity with all aspects of the Lightning network. I’ll assume you have a wallet, some channels, and sufficient inbound and outbound liquidity to make simple transactions. If you’re new to Lightning, this approach probably isn’t for you - I recommend consulting Bitcoiner’s Guide before continuing.
Given the number of ancillary services and technologies which are required to build something like this using the Lightning Network, I’ll run through the key components below.
Note: If you’re already proficient with LNURL, LNURLp, LNBits, and Cloudflare Tunnels, you can jump straight to the step-by-step.
What is LNURL?
LNURL is a set of unofficial (but widely adopted) protocol extensions for Lightning, designed to make payments more user-friendly and flexible.
The LNURL protocols allow wallets and apps to interact directly via HTTPS, abstracting away complexities such as invoice generation. It works by encoding an HTTPS URL into a bech32 string (which starts with lnurl1), which can then be shared as a QR code. When a compatible wallet opens this LNURL, it can query the corresponding endpoint to perform various actions.
What is LNURLp?
LNURLp is short for LNURL-pay, one of the most popular features under the LNURL umbrella. In a typical Lightning payment, the recipient must create an invoice for each individual payment. These invoices encode not just the amount, but an expiration time, routing hints and more, meaning a static QR code cannot be used to receive payments or donations.
With LNURLp, the process can instead be initiated by the payer, and largely automated. The payer scans a static LNURLp QR code with their wallet, which receives instructions on how to request an invoice. This invoice can be a fixed amount or a range, making it ideal for static donation or tip jars.
Note that from the user’s perspective, all this feels seamless. LNURLp-compatible wallets like Phoenix, Zeus, Breez, and others handle all this automatically.
What is LNBits?
LNBits is the service you’ll run on your Lightning node to dynamically generate those on-demand invoices for your website’s visitors. It’s a free and open-source (FOSS) Lightning wallet and accounts system which is included with Raspiblitz by default.
LNBits runs a Python server which sits on top of any funding source, and it provides a web interface for managing dozens of payment-related extensions, including LNURLp.
What is a Cloudflare Tunnel?
The final piece of the puzzle is a Cloudflare Tunnel (previously called an Argo Tunnel), which is how we’ll make the LNBits instance running on your Raspberry Pi accessible on the public web.

Cloudflare Tunnels is free software which can open a secure, outbound-only route from your local network to a public web URL (like pay.yoursite.com), without opening ports on your router or exposing your home’s IP address.
Is all this really necessary?
Depends what you’re looking for. For most users, I’d actually recommend using a static receiving address provided by Wallet of Satoshi, Phoenix, Zeus, etc. While some of these wallets are custodial or semi-custodial, I don’t think that’s such a bad thing given the UX advantages they offer. They’re all non-KYC, and you get to receive sats on a simple static address without worrying about uptime or liquidity. You can then periodically sweep funds into your primary non-custodial Lightning wallet running on your private node.
The approach I outline in this guide is suited to users who want to receive funds directly to the Lightning wallet running on their home node. It’ll get you far closer to the underlying protocols, making it a good educational experience.
Let’s go!
2. Installing LNBits on Raspiblitz
Log in to your Raspiblitz via SSH, and head to the “Services” menu. Select LNBits and activate it.
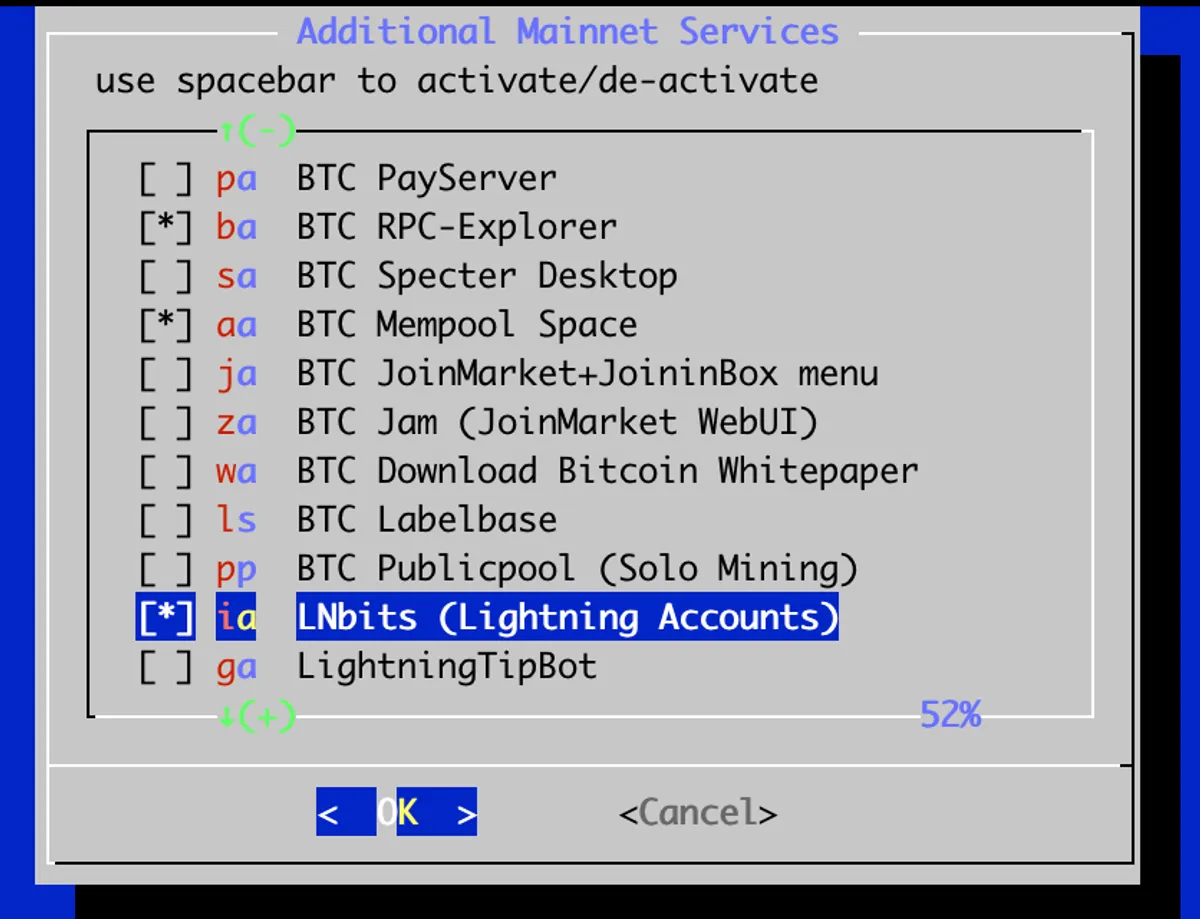
Once it’s installed, you’ll see a new LNBits option on the main menu. This will tell you the IP and port number used to access the web interface (something like 192.168.1.123:5001/wallet?usr=456).

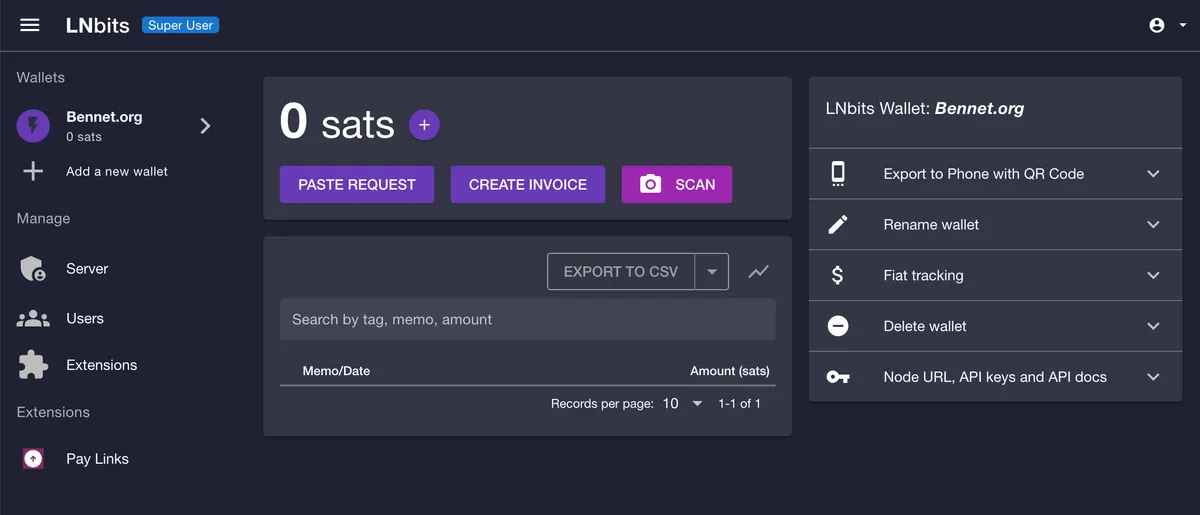
Head to this URL in your browser. You’ll see a warning because of the self-signed SSL certificate. Click “Advanced” and proceed to the LNBits interface. You’ll need to create a superuser account - make a note of your username and password.
Create a new wallet and name it something recognizable (e.g. “donations” or your site name). This creates a wallet within LNBits - it’s separate from your main LND wallet, but funds still ultimately flow through your node.
Next, head to the Extensions screen and enable LNURL-pay. Select the latest release supported by your LNBits version.
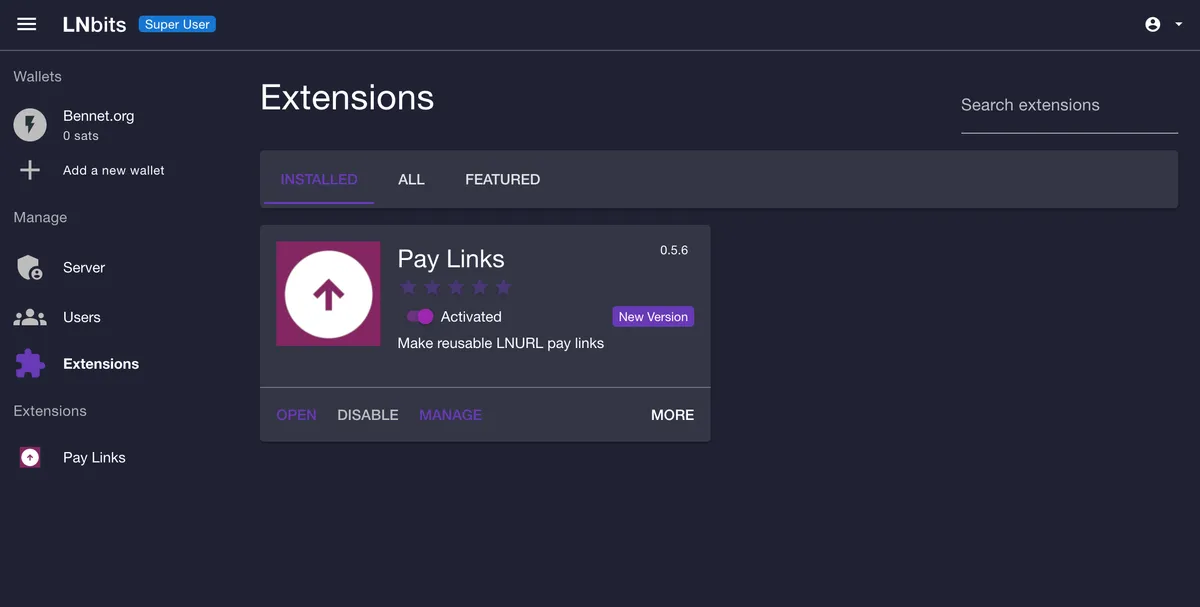
Once enabled, you’ll notice that “Pay Links” will appear under the Extensions list on the left - click it.
Time to create your payment link. Hit “New Pay Link”, choose your newly created wallet, enter a short description, and choose your lightning address (e.g. pay@192.168...). Uncheck “Fixed amount”, enter your chosen min/max, and under “Advanced options” choose a maximum character length for the message users can attach to their payment.
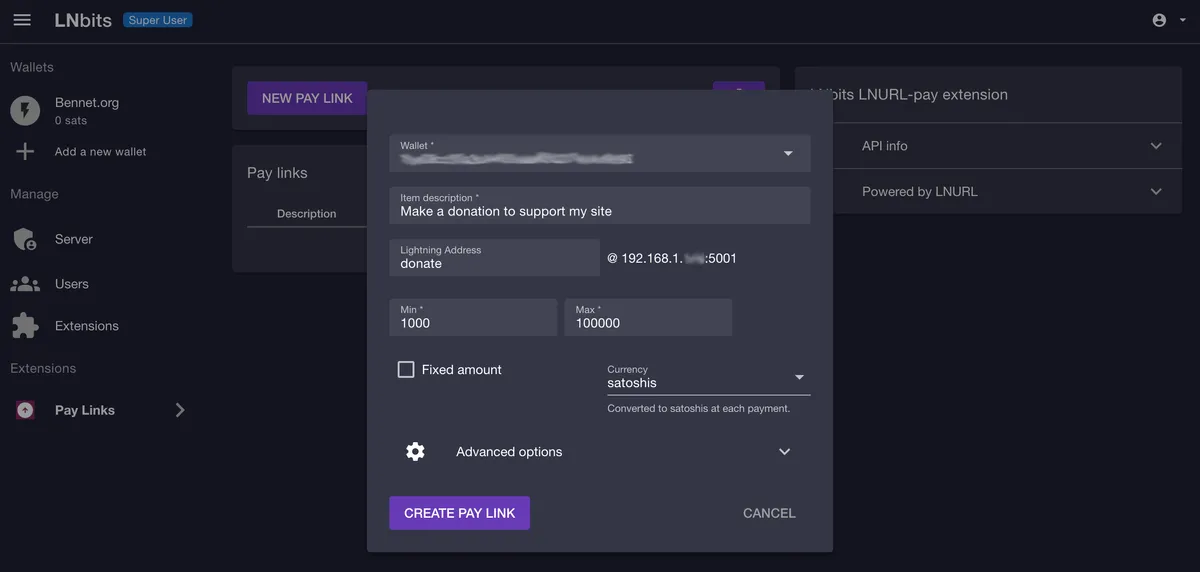
Hit “Create Pay Link” to close the screen. You can view your shareable page by hitting the icon next to your new link.
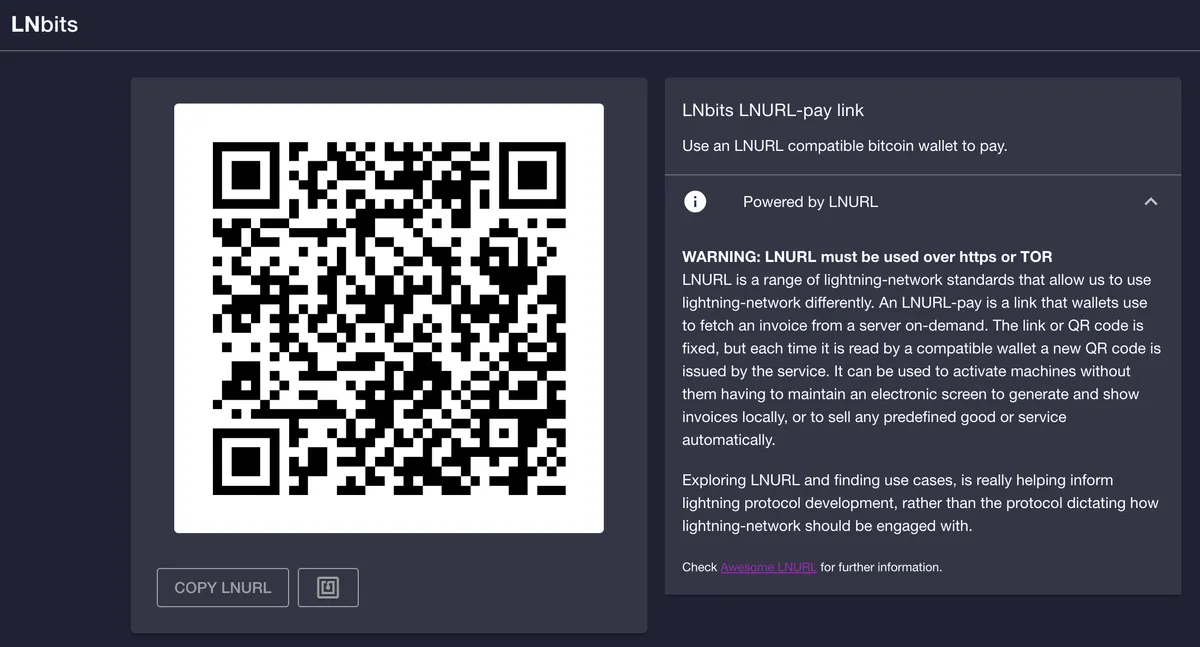
You now have everything you need to accept payments, at least in principle:
- A donation page (e.g.
192.168.1.123:5001/lnurlp/link/<pay_id>) - An LNURLp string and associated QR code
However this is far from practical. Your donation page is unstyled and generic-looking, and it’s only accessible via your internal LAN network. We need a way to expose this publicly. We have three options:
- Tor address: Technically public, but
.onionURLs are not user-friendly for most people and require a special browser. - IP2TOR: A paid tunnel service which can be installed on Raspiblitz. It lets you rent a port on a clearnet IP through which services on your Raspiblitz can be accessed on the public web. It’s dependent on there being active vendors willing to sell to you (at time of writing, none were available).
- Cloudflare Tunnel: A free command-line tool from Cloudflare which lets you open secure, outbound-only routes from a local network to a public web URL on your Cloudflare-configured domain, without opening ports on your router or exposing your home’s IP address.
For this tutorial we’ll go with Cloudflare Tunnels. While I believe this is a pragmatic choice, it does introduce a dependency on a large corporation, which I don’t do lightly. Readers who are particularly privacy-conscious and want to avoid any such trade-offs might wish to explore a self-hosted reverse proxy, or sticking with Tor.
3. Setting up a Cloudflare Tunnel
As I mentioned in the prerequisites section, your domain’s DNS settings need to be managed on Cloudflare. If you’re not already on Cloudflare, here’s a guide to migrating your DNS without downtime.
First, we’ll install the Cloudflare Tunnels daemon (cloudflared). Login to your Pi via SSH as admin, exit the menu to the command line, and install it:
wget -O cloudflared https://github.com/cloudflare/cloudflared/releases/latest/download/cloudflared-linux-arm64
chmod +x cloudflared
sudo mv cloudflared /usr/local/bin/
These commands download the binary, set the execution permissions, and move the executable into /usr/local/bin so you can run it from anywhere.
Next, run cloudflared tunnel login. This will open a browser for authentication, where you’ll select your root domain (e.g. yourdomain.com) that’s already on Cloudflare. You’ll define the actual subdomain (like pay.yourdomain.com) later.
Once this process is complete, the tool will download a certificate file (cert.pem) to ~/.cloudflared/. We’ll move that file to /etc/cloudflared, so it will sit alongside the configuration file we’ll create shortly:
sudo mkdir -p /etc/cloudflared
sudo cp ~/.cloudflared/cert.pem /etc/cloudflared/
Create your config file using sudo nano /etc/cloudflared/config.yml, then add the required information:
tunnel: lnbits-tunnel
credentials-file: /etc/cloudflared/lnbits-tunnel.json

ingress:
  - hostname: pay.yourdomain.com
    service: https://localhost:5001
    originRequest:
      noTLSVerify: true
  - service: http_status:404
Don’t forget to update pay.yourdomain.com to reflect the hostname you chose during the Cloudflare login process, and to make sure that your LNBits port number is correct (5001). In case you were wondering, the noTLSVerify flag ensures that the tunnel functions despite the self-signed certificate on the LAN service.
Make sure your config file is readable by root by running sudo chmod 644 /etc/cloudflared/config.yml.
Next, we’ll create the tunnel:
sudo cloudflared tunnel create lnbits-tunnel --credentials-file /etc/cloudflared/lnbits-tunnel.jsonRegister the tunnel route (don’t forget to update your subdomain):
cloudflared tunnel route dns lnbits-tunnel pay.yourdomain.comThis will create a proxied CNAME record for your chosen subdomain which points to your Pi. You can verify this in your Cloudflare DNS dashboard:
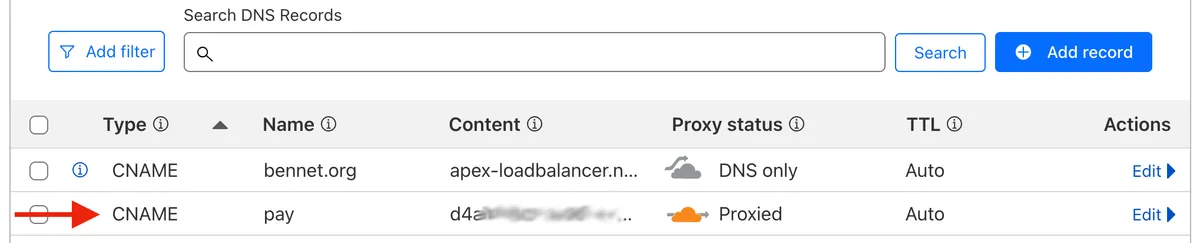
If the DNS record isn’t created automatically, create a CNAME record for your desired subdomain pointing to <tunnel-id>.cfargotunnel.com.
Finally, we want to enable our tunnel as a background service which starts on boot, rather than having to enable it manually. Run the following commands in order:
sudo cloudflared service install
sudo systemctl start cloudflared
sudo systemctl enable cloudflared
You can check the service using sudo systemctl status cloudflared. If it’s running successfully, you’ll see Active: active (running). When you visit your chosen subdomain, you’ll be greeted by the LNBits interface.
- Before:
https://192.168.1.123:5001/lnurlp/link/<pay_id> - After:
https://pay.yoursite.com/lnurlp/link/<pay_id>
Well done! You have your generic-looking LNBits page publicly accessible on a subdomain of your website via a tunnel. At this point it’s worth pausing to consider your options:
- Link users directly to this page. It’s unstyled and lacks any custom messaging, but the QR code will work fine. If you opt for this route, you might be better off using a simpler LNBits extension like Tip Jar, and just expose this via your tunnel.
- Embed a custom payment component onto your main site: If you want full control over the design, would like to embed your QR code onto your main website, or plan to extend the logic in the future, then we can take this further.
If you’re calling it a day with option 1, farewell! If you’re proceeding with option 2, let us continue…
4. Implement QR code client-side
Open your LNBits payment page via your Cloudflare tunnel (e.g. https://pay.yoursite.com/lnurlp/link/<pay_id>), and hit the ‘Copy LNURL’ button. This long string starting with LNURL contains everything you need to build an entirely customized experience for your website’s visitors.
Try pasting your LNURL into lightningdecoder.com to see what it actually encodes. Note the callback URL on your subdomain exposed via tunnel, starting with /lnurlp/api/ - this is the endpoint which donating wallets will hit.
This LNURL string is all you need to create a custom component. You can even plug it straight into my Bitcoin Serverless Payments widget and it’ll work just fine. This will give you something like this (hit the Lightning tab):

Scan with Tap to open your Bitcoin wallet, or copy the on-chain address below.

Scan with Tap to open your Lightning wallet, or copy my Lightning address below.
Once you’re done, try scanning your QR code. If you get an error at first (specifically a 520 error via Cloudflare when the wallet requests the invoice), try going into LNBits, clicking “Server”, and then “Restart Server”. I’ve had this happen when the wallet was created shortly after LNBits was installed.
Remember that if you make changes to your LNBits payment link, or alter your configuration in any way, you may have to update the LNURL in your frontend code. Test changes thoroughly!
5. Tighten your security
Everything’s now in place for you to accept Lightning payments on your website. However, if you head to whichever subdomain you’ve used to tunnel into LNBits, you’ll notice that the main admin page is also accessible (i.e. on pay.yourdomain.com).
While everything is behind a login, this does increase the potential attack surface. An attacker might attempt to brute force their way into your system, or your super user credentials could become compromised. It also needlessly reveals details about your setup - the fact you’re running LNBits, which version you’ve installed, and so on.
We can make this more secure. Any configuration to your LNBits instance can be done via your local network; the only path which needs to be available on the web is the /lnurlp/api/ endpoint. Since the subdomain is already on Cloudflare, we can use Cloudflare Access to manage its permissions.
Log in to Cloudflare and select Zero Trust in the left hand nav. You’ll need to create an account and setup billing, but the free tier is sufficient for our purposes.

We’re going to create two applications: one which applies to the whole subdomain and blocks all requests by default, and a second more-specific override which allows access to the /lnurlp/ subfolder.
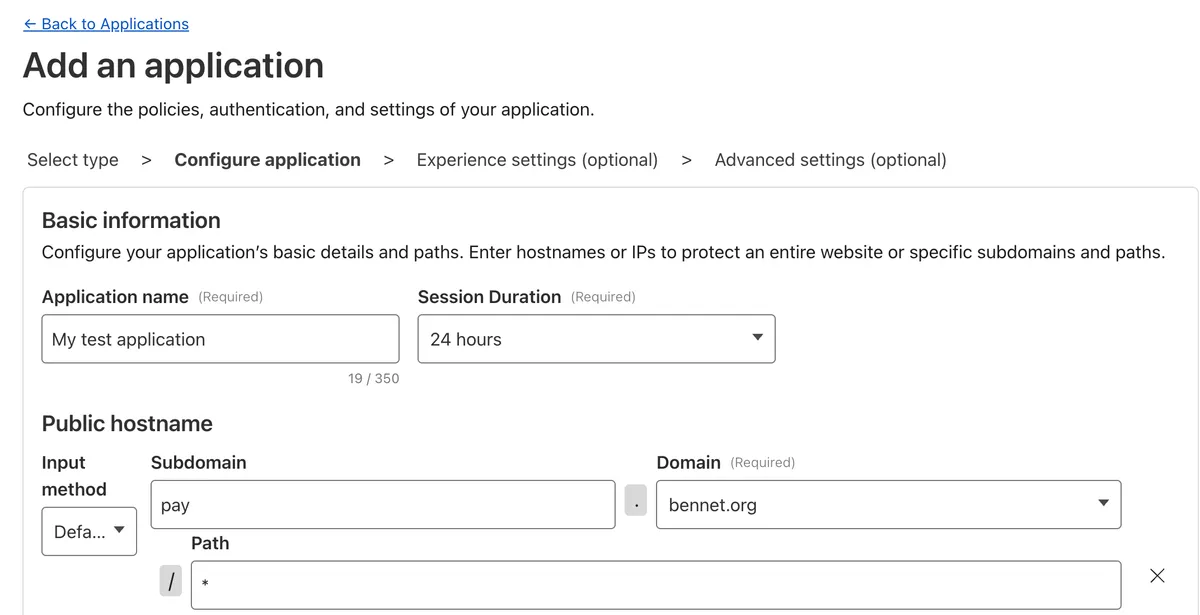
Click “Create an application”, and for Type choose “Self Hosted”. Enter a name, and leave session duration as default. Hit “Add public hostname”, and configure your subdomain. Use a wildcard (*) for the path - we want all URLs on this hostname to fall within the scope of this first application:
Cloudflare Access is a deny-by-default service, so for this first application we don’t technically need a policy. But I suggest creating one which allows your home IP address to access the application.
Scroll down and click “Create new policy”. Give it a name (e.g. “Only allow home IP”), choose “Allow” as the action. Scroll down to “Add Rules”, and using the Selector dropdown under Include choose “IP Ranges”. Enter your home’s static IP address, then hit Save at the bottom.

Once created, go back to your other browser tab and add this policy to your application. Save your application. If you try to navigate to your subdomain, you should now be greeted with a 403 Forbidden error.
Finally, we’ll define the subset of requests which we do we want to allow. Create a second application, following the same process as you did for the first, but under “Path” enter /lnurlp/*. The higher specificity takes precedence.
Add a new policy to this second application called “Allow all”, with Action set to “Bypass”. Under rules, choose Include Selector “Everyone”. Save the application.
Wallets trying to make a donation will still have access to your LNURL endpoint, while normal unauthenticated requests from browsers to pay.yourdomain.com will be blocked with a 403 response.
6. Wrap-up & next steps
I hope this tutorial was useful.
When I first dove into the world of Lightning, I naively assumed that I’d find layer 2 protocols fairly straightforward. As I understood it, Lightning aimed to solve Bitcoin’s scalability problem by enabling small, instant, peer-to-peer payments to occur without writing them to the blockchain. I imagined a vast system of Bitcoin IOUs changing hands, with final settlements occurring on-chain once peers “cashed out”.
While this mental model isn’t far off, the reality is more complex. I found the deluge of new terminology confusing, and was disheartened to learn how many ancillary services were required to build anything which could reliably accept online payments from strangers. Hopefully this tutorial will help anyone who’s in a similar position to learn their way around the Lightning network.
Having learned more about the wider ecosystem - specifically what’s coming next - I’m optimistic about the network’s future. If you’d like to learn more about the upcoming UX improvements, I’d recommend watching Matt Corallo’s recent appearance on the What Bitcoin Did podcast, where he discusses topics like BIP-353 which have the potential to vastly simplify use-cases like the one I explored today.
If you enjoyed this guide, you can choose to be notified via email next time I publish an article on Bitcoin. And of course - if you found this helpful, any donations via the QR code are graciously accepted!
Thanks for reading.